Welcome to Mellel
This guide is designed both to help you quickly get started with Mellel and give you a basic understanding of all that Mellel has to offer. Mellel is a powerful and sophisticated word-processor but also a bit unconventional. We are proud we did it this way for a very simple reason: when choosing between old familiar practices on one hand and ease of use on the other, we chose the latter, and while it might take you a little bit longer to learn how to implement some features, in the end you will find yourself spending less time trying to figure out the so-called “industry standards” and more time doing what you want to do with Mellel: writing and creating and being productive.
Installation
To install Mellel:
- Download Mellel from www.mellel.com/download
- Locate the downloaded file mellel_60703.dmg and double click it.
- Drag the red Mellel typewriter icon to the Applications folder next to it.
- Double-click Mellel in the Applications folder to launch it.
Disk Image Window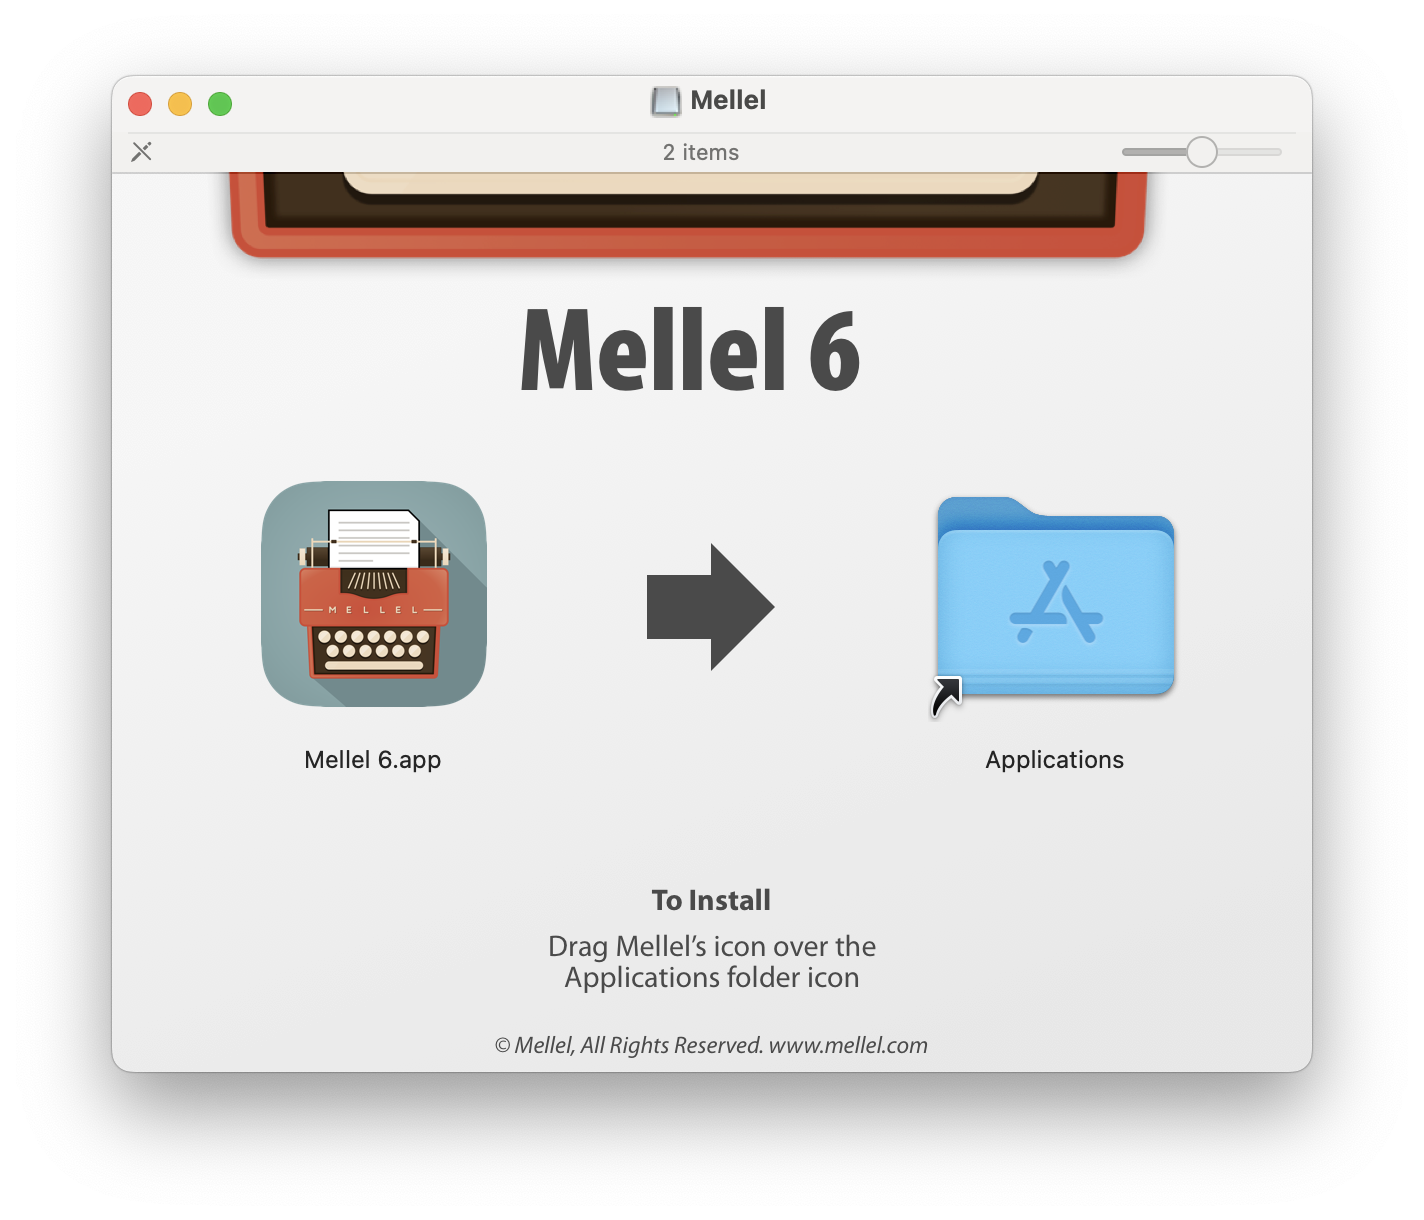
Trial and Activation
When you launch Mellel, the following window will appear:
Trial Dialog Window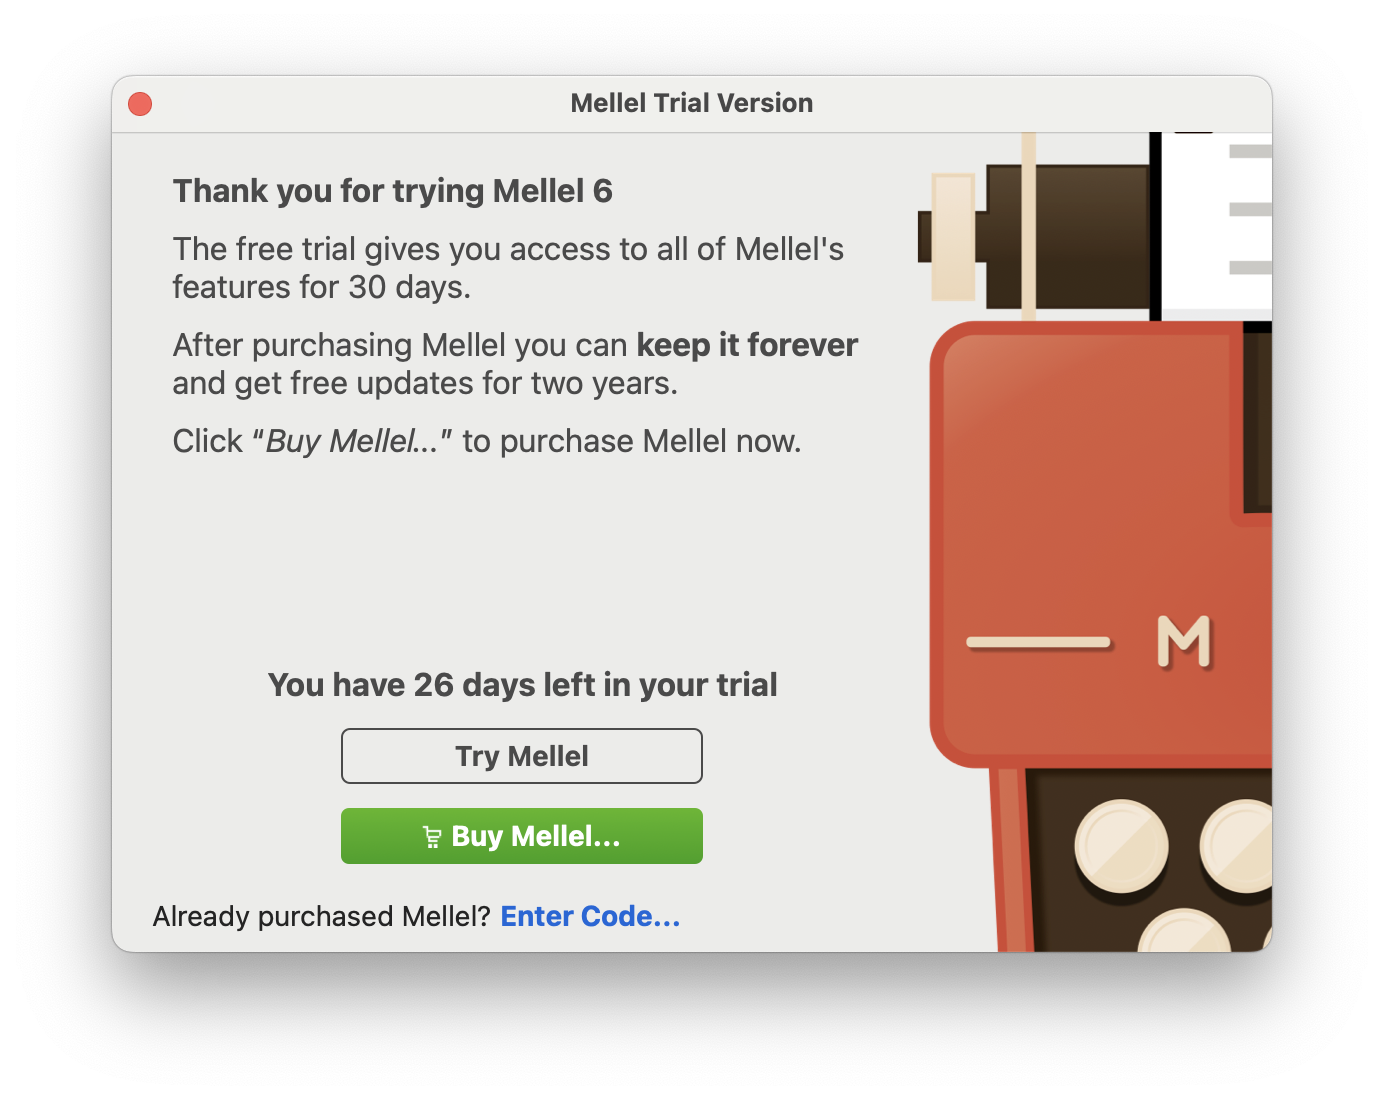
If you have already bought Mellel, have your user name and registration code (they should have been sent to you when you purchased the license) handy. At the bottom of the screen, click Enter Code and enter your user name and registration code.
If you haven't purchased Mellel yet, you can use it in trial mode. Click Continue to try Mellel for 30 days without restrictions.
When you're ready to purchase Mellel, click Buy Mellel to be guided through the purchase process.
Character Formatting
Character formatting, such as setting the font, size and underline, is done using the character palette's "Attributes" tab. To bring the character palette to the front, click the Character side-tab in the palette stack or choose Window > Palettes > Character. If the Attributes tab is not visible, click the Attributes tab to reveal it.
Character Palette Attributes Tab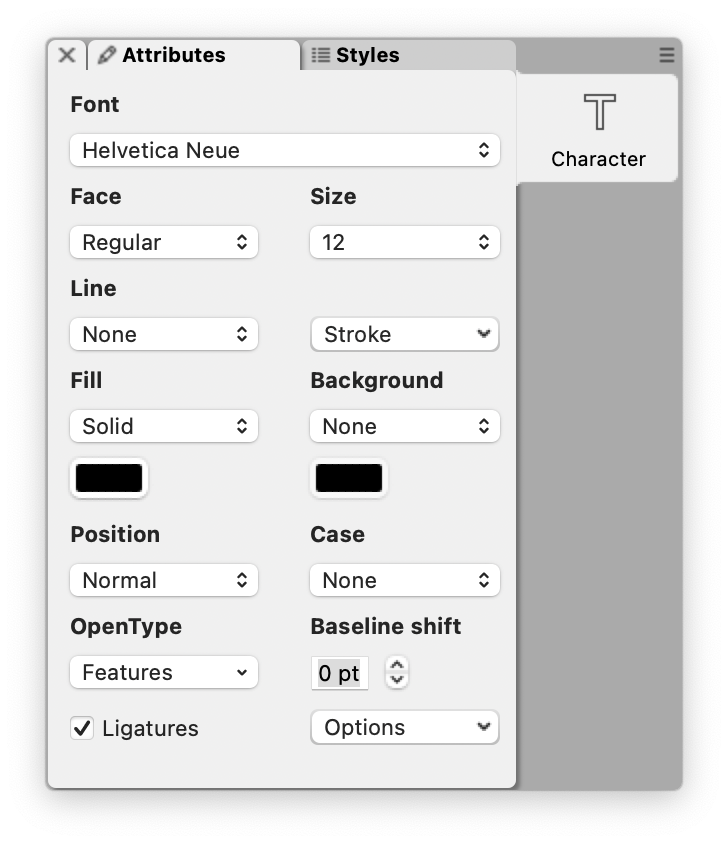
To format text, select it and then choose the desired attribute in the palette. For example, to change the font:
- Select the text you want to change.
- Choose the font name in the "Font" popup menu in the character palette.
Applying a Font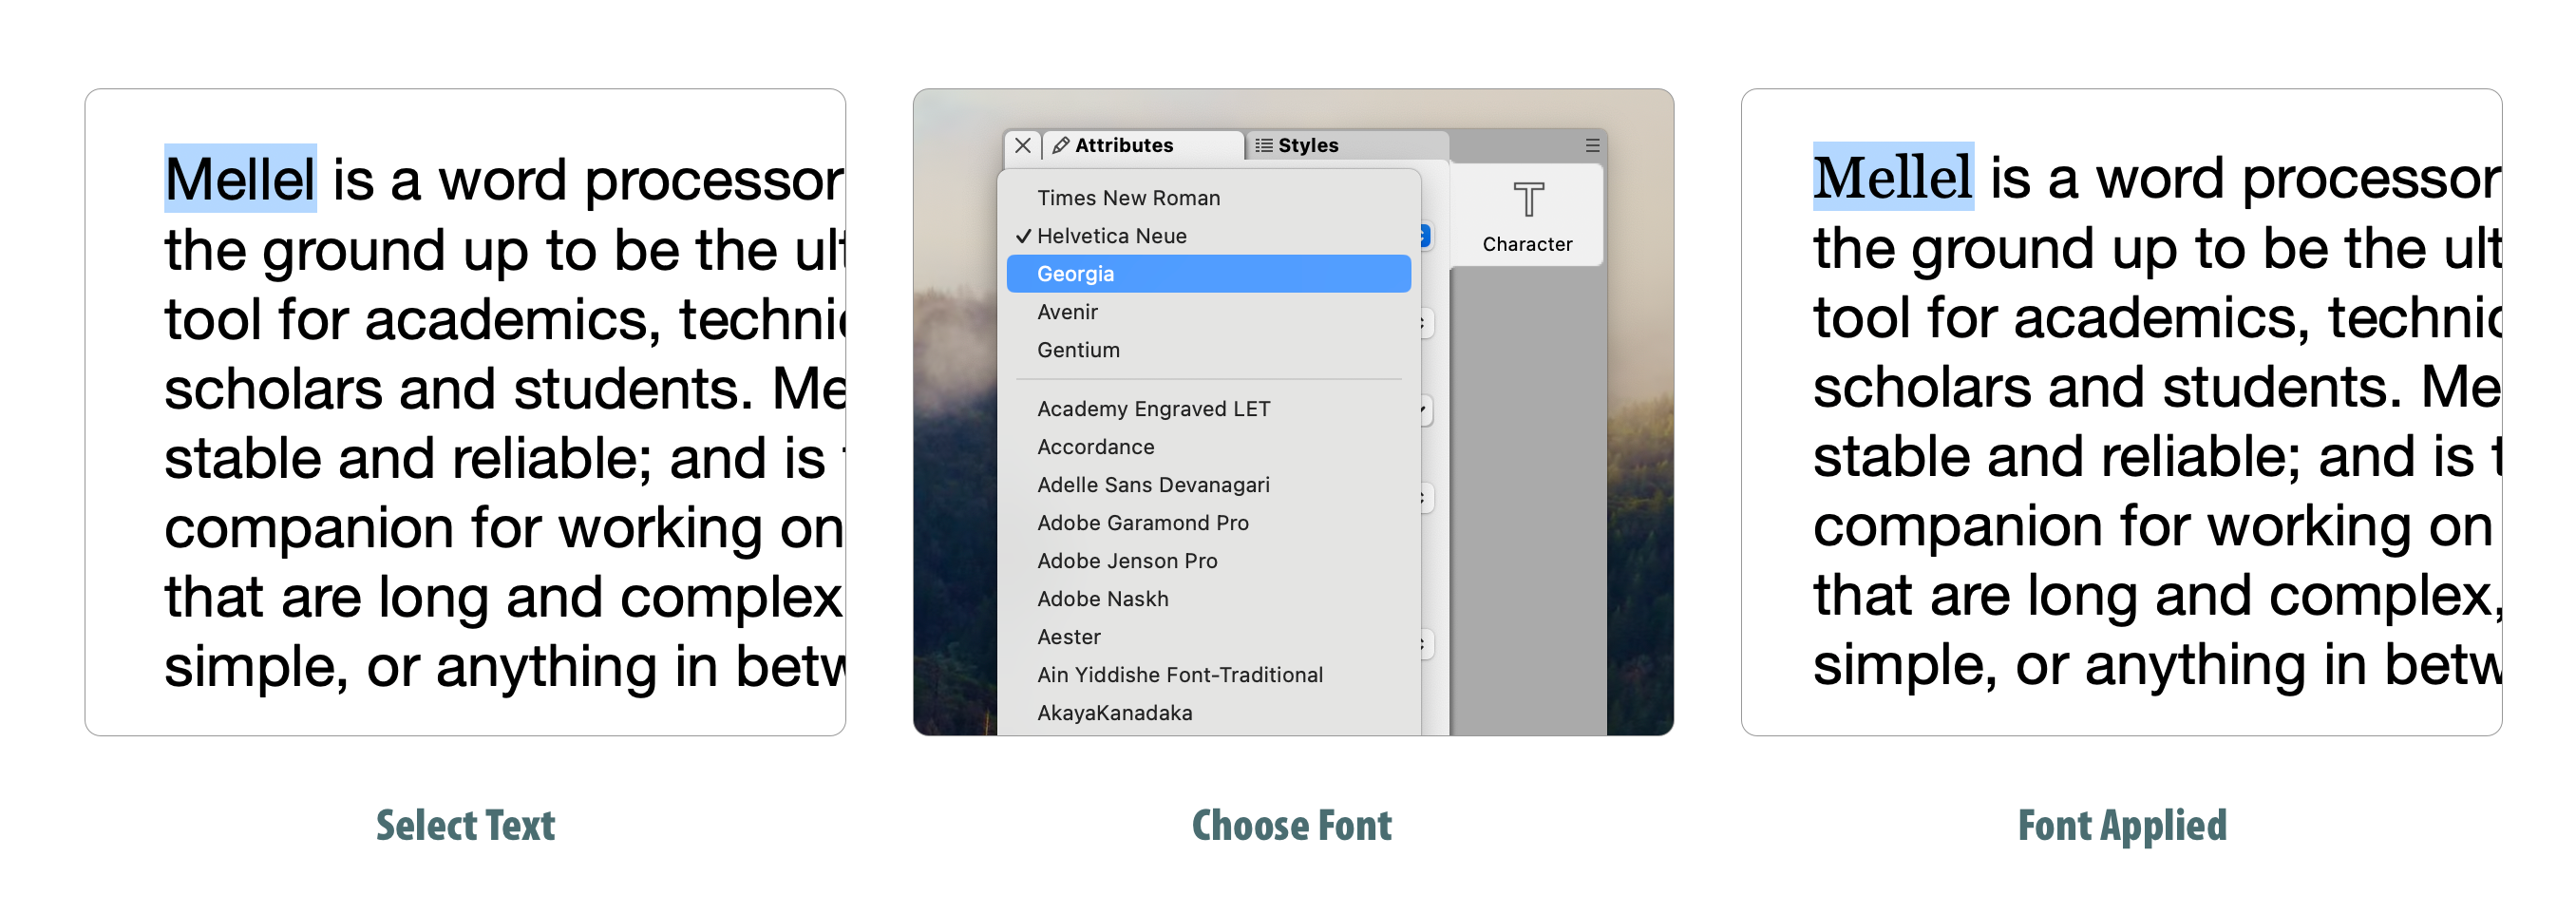
Use the "Face" popup menu to set the typeface to bold or italic; use the "Size" popup menu to change the size. To underline text, choose "underline" in the "Line" popup menu.
To learn more about character formatting, refer to the Character Formatting guide.
Paragraph Formatting
Paragraph formatting, such as the alignment (left, right, center), line spacing and margins, is done using the paragraph palette "Attributes" tab. To bring the paragraph palette to the front, click the Paragraph side-tab in the palette stack or choose Window > Palettes > Paragraph. If the Attributes tab is not visible, click the Attributes tab to reveal it.
Paragraph Palette Attributes Tab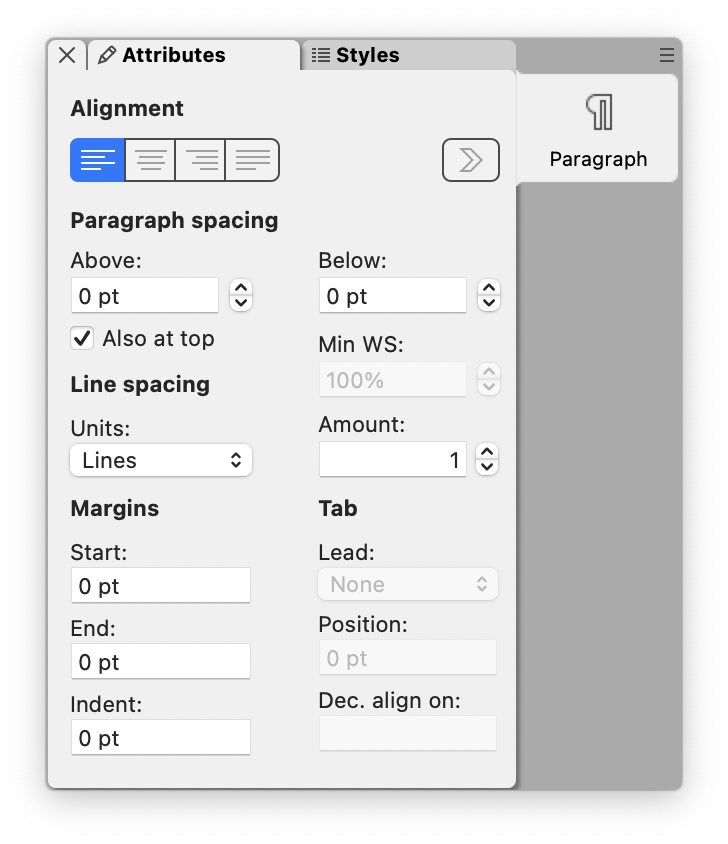
Format the paragraph by placeing the blinking insertion point in the paragraph you wish to change and choosing the desired attribute in the palette. You can apply changes to multiple paragraphs by selecting them before choosing the attribute in the palette. For example, to center a paragraph:
- Place the insertion point in the paragraph you wish to affect.
- In the paragraph palette "Attributes" tab, click the Center alignment button.
Setting Paragraph Alignment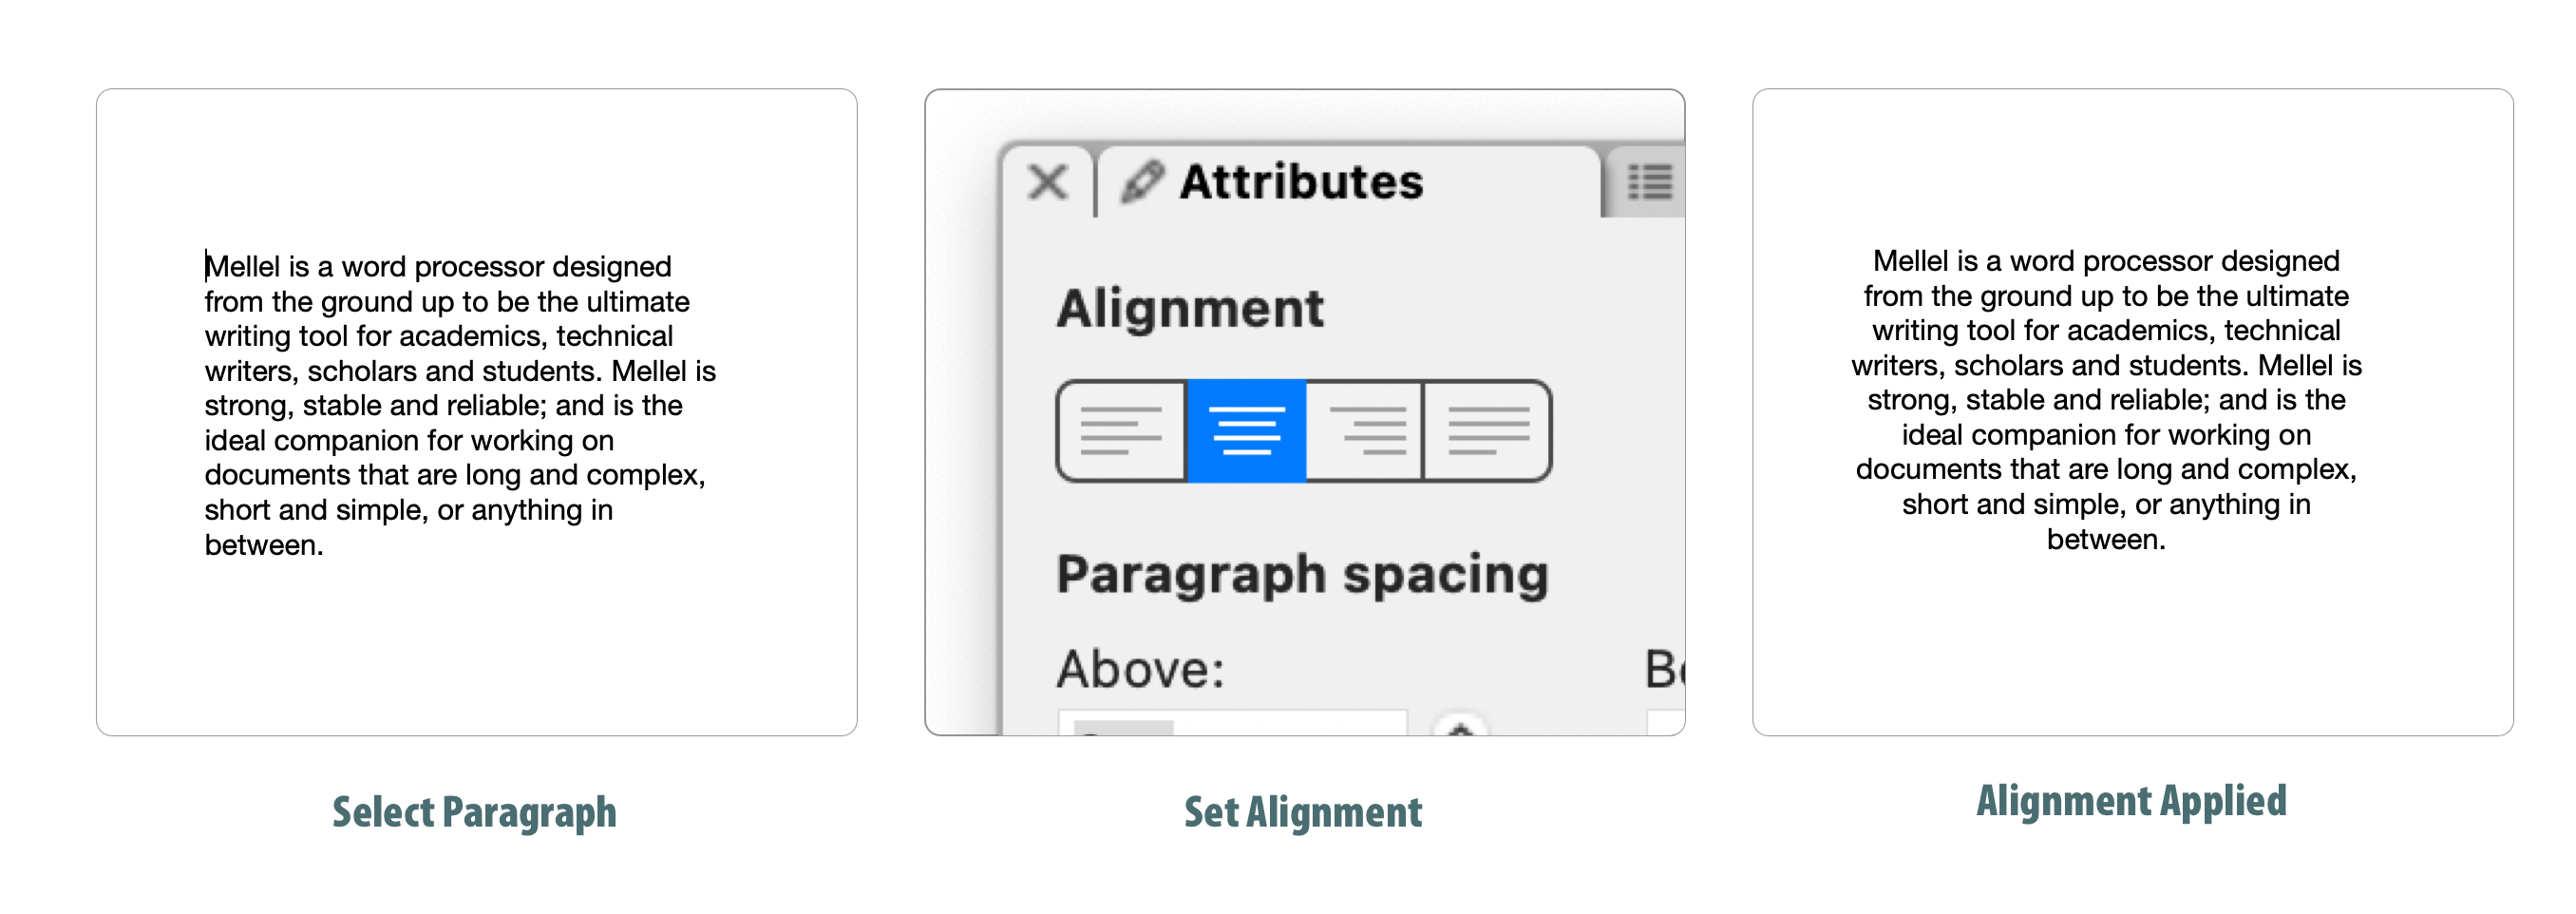
Note: You can also use the alignment buttons on the document's window toolbar.
To set line spacing to double, choose "Lines" (if not already selected) in the "Line Spacing" "Units" popup menu and enter 2 in the "Amount" field.
Setting Line Spacing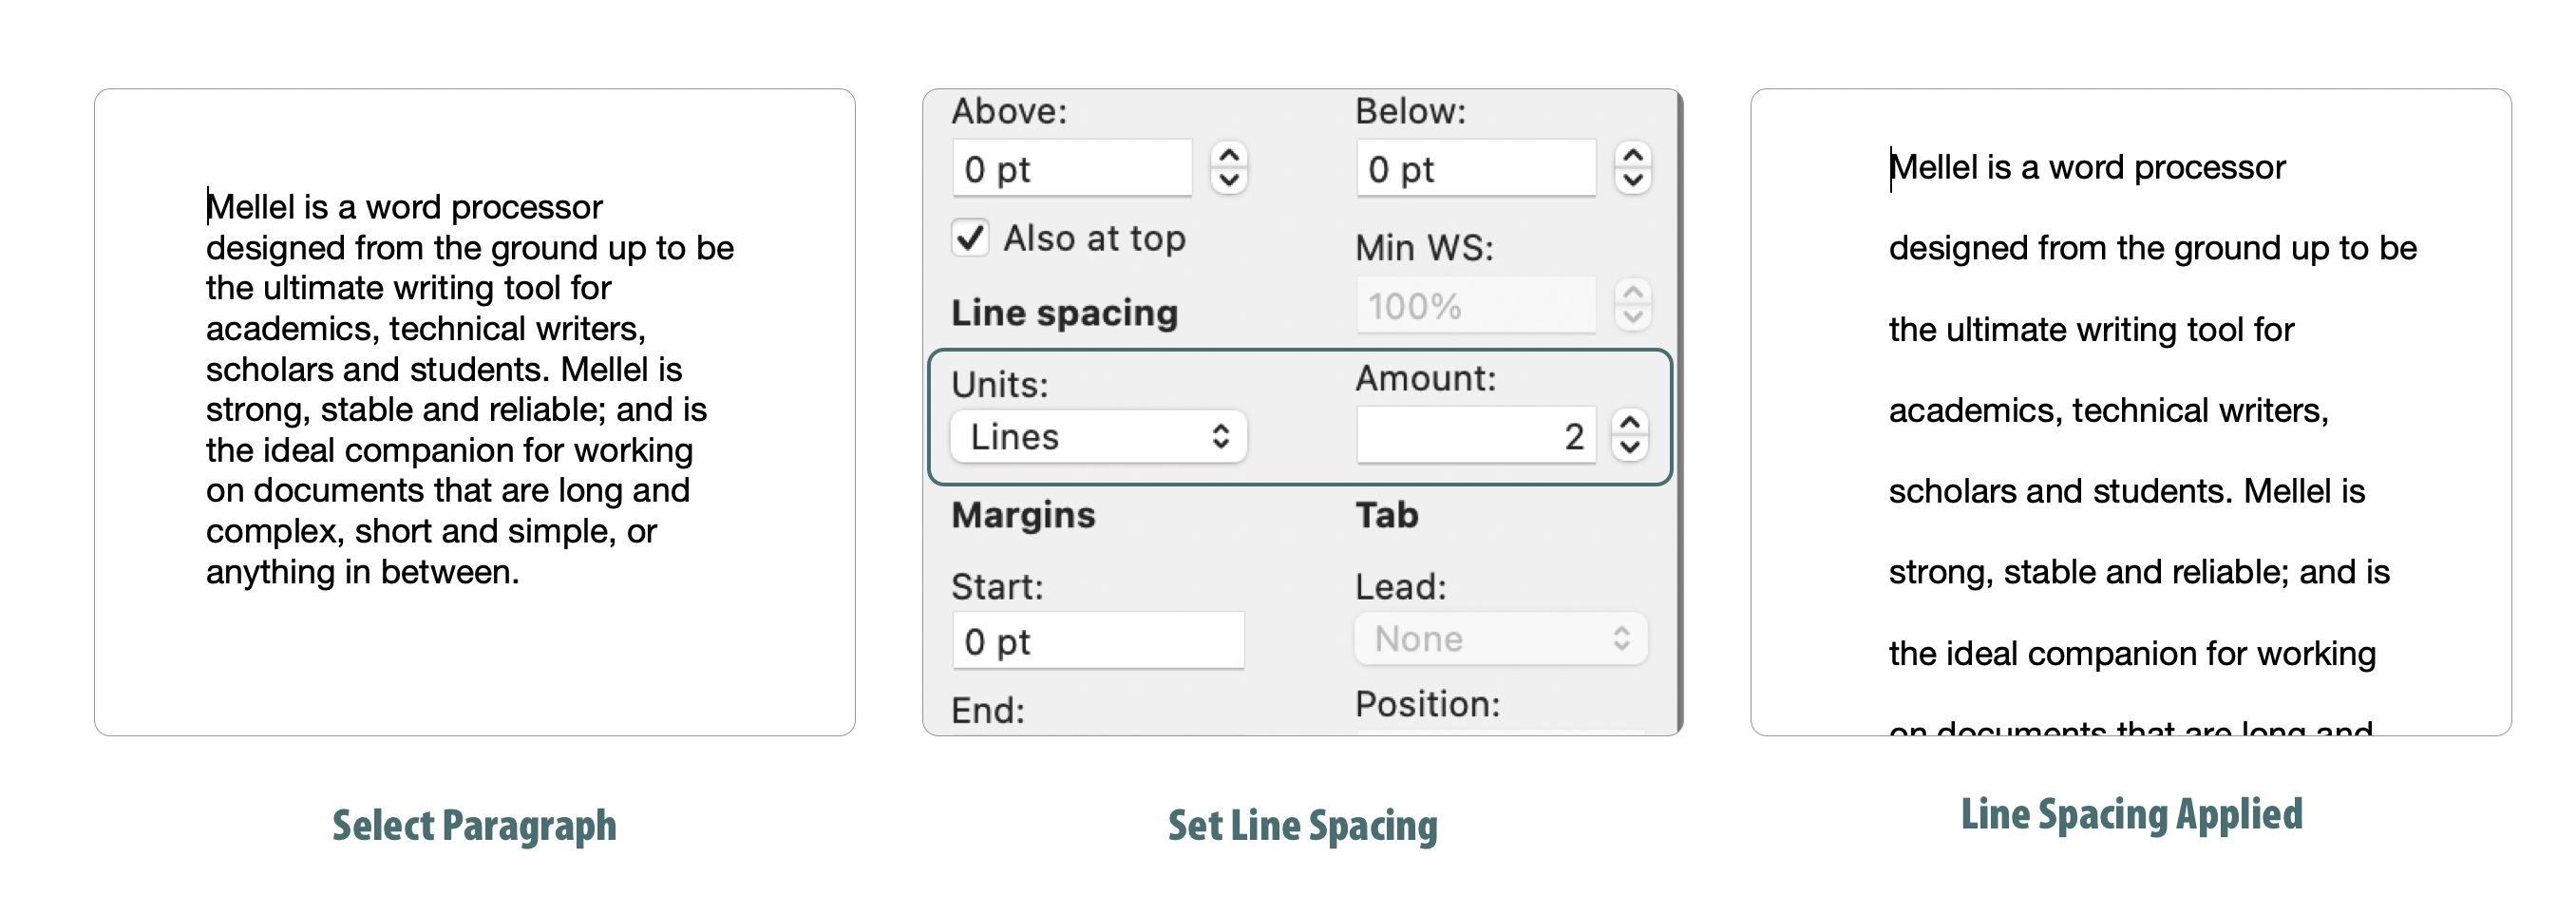
To indent the first line of a paragraph, enter the desired indent amount (for example 36) in the "Indent" field of the paragraph palette.
Indenting a Paragraph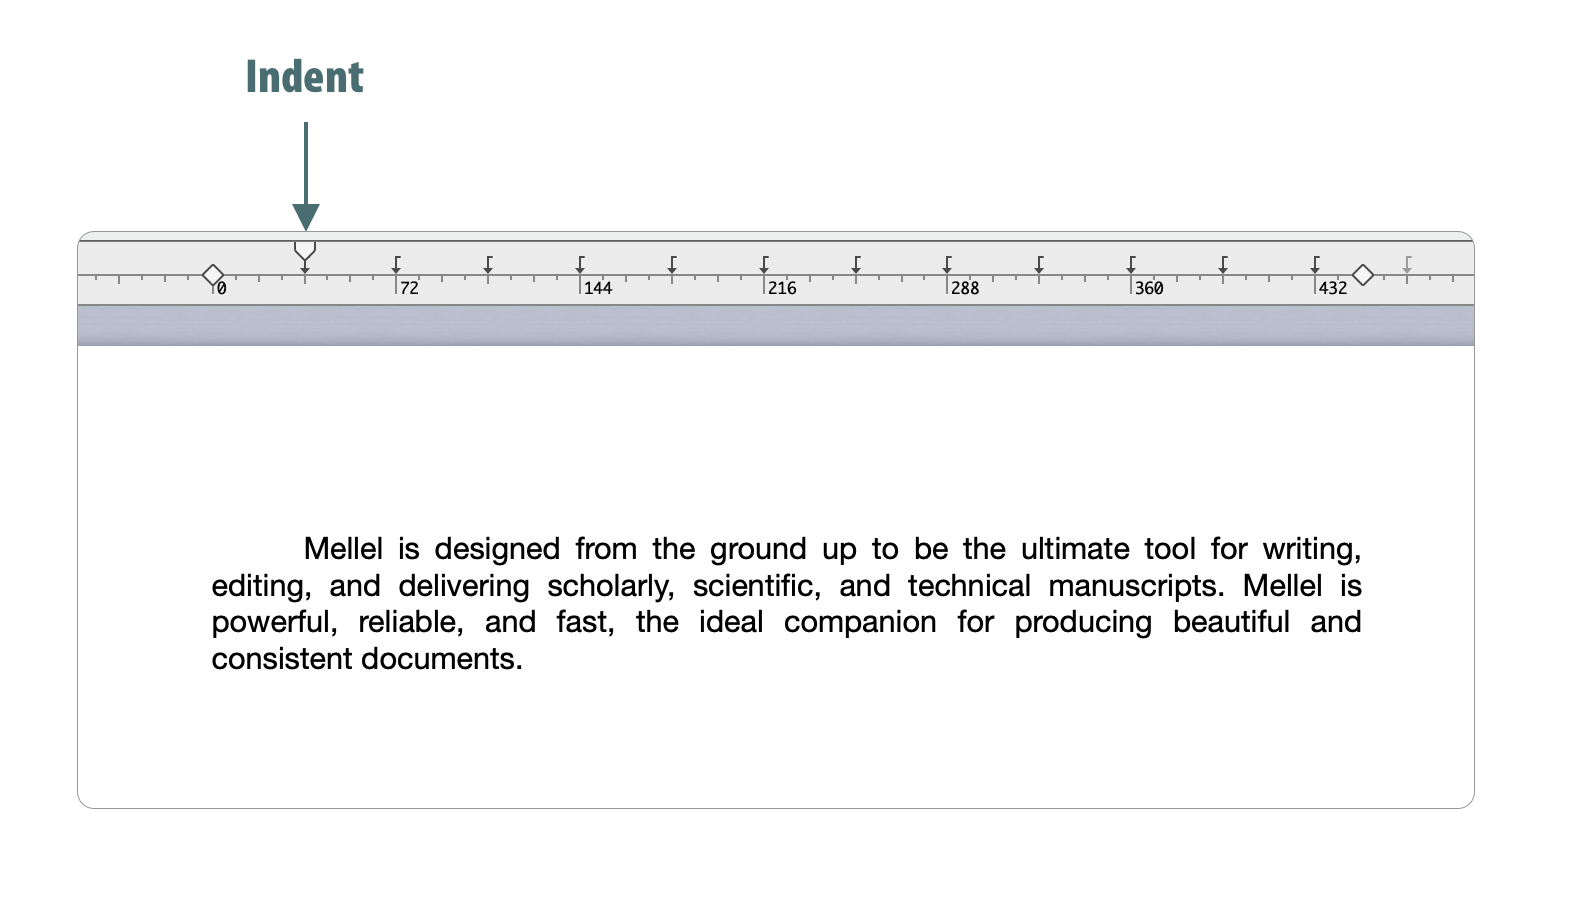
Alternatively, to produce a "hanging indent", enter the desired indentation amount in the "Start" field. This will indent the paragraph’s lines, except the first line.
Setting Hanging Indent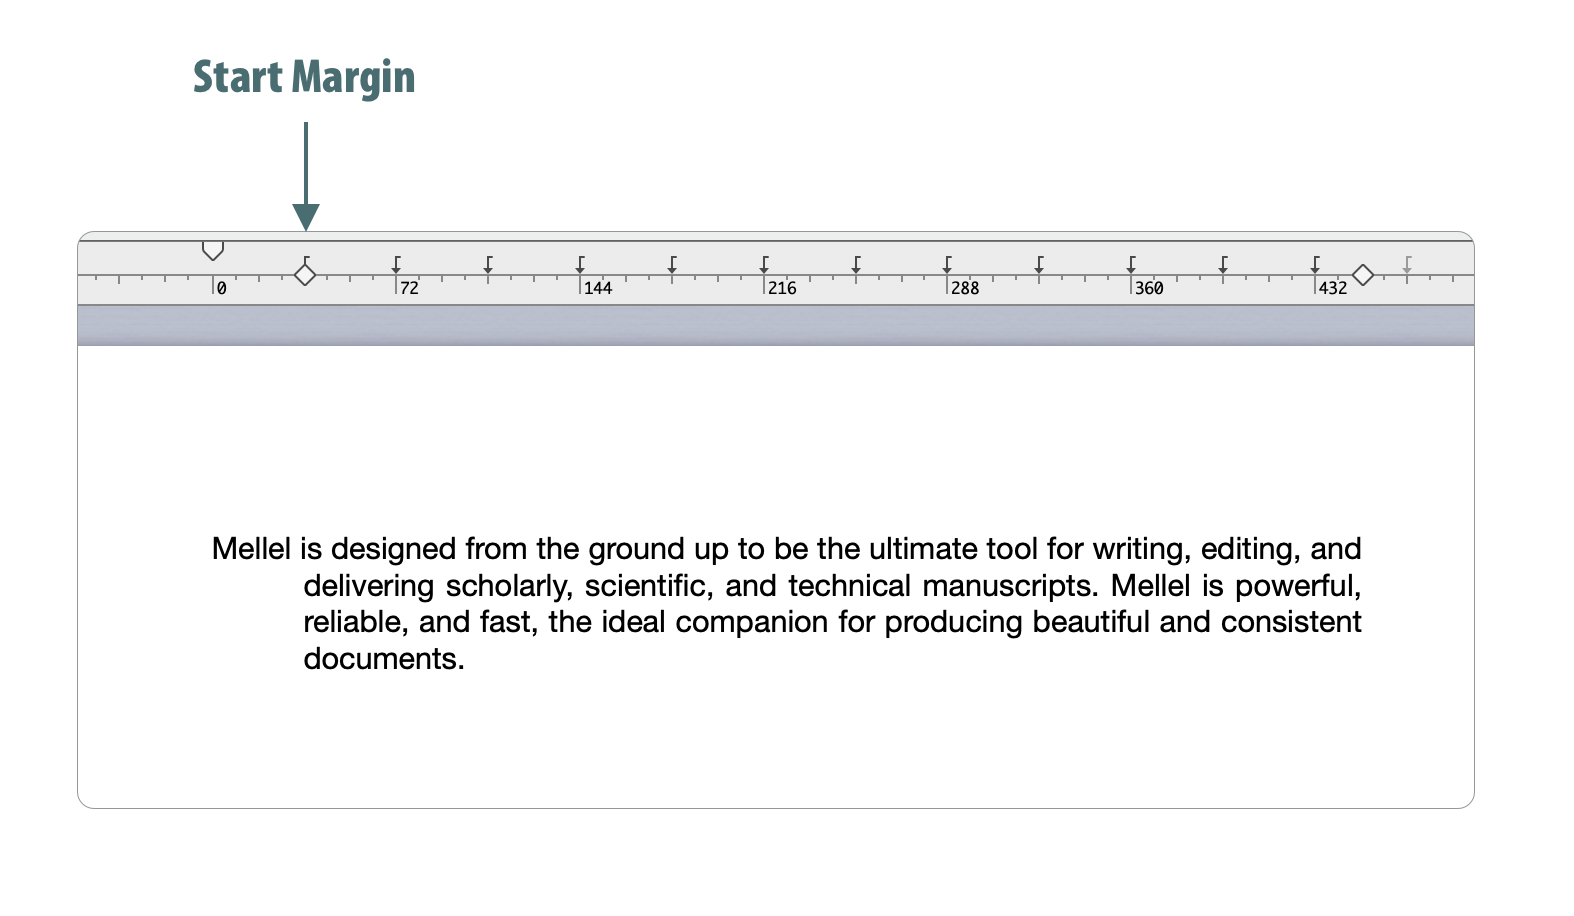
Note: You can also make margin changes visually using the ruler.
To learn more about paragraph formatting, refer to the Paragraph Formatting guide.
Other Formatting Options
Formatting options relating to other aspects of the document, such as sections, page ranges and lists, are controlled via the corresponding palettes.
Section attributes, such as multiple columns and line numbering, are controlled in the "Section" palette. Formatting options relating to page ranges, such as headers and footers, page numbers and page orientation (landscape or portrait), are handled via the "Page" palette. Options relating to simple lists, such as numbering type (Roman, Arabic, bullets) and list indentation are handled in the "List" palette.
Other Formatting Palettes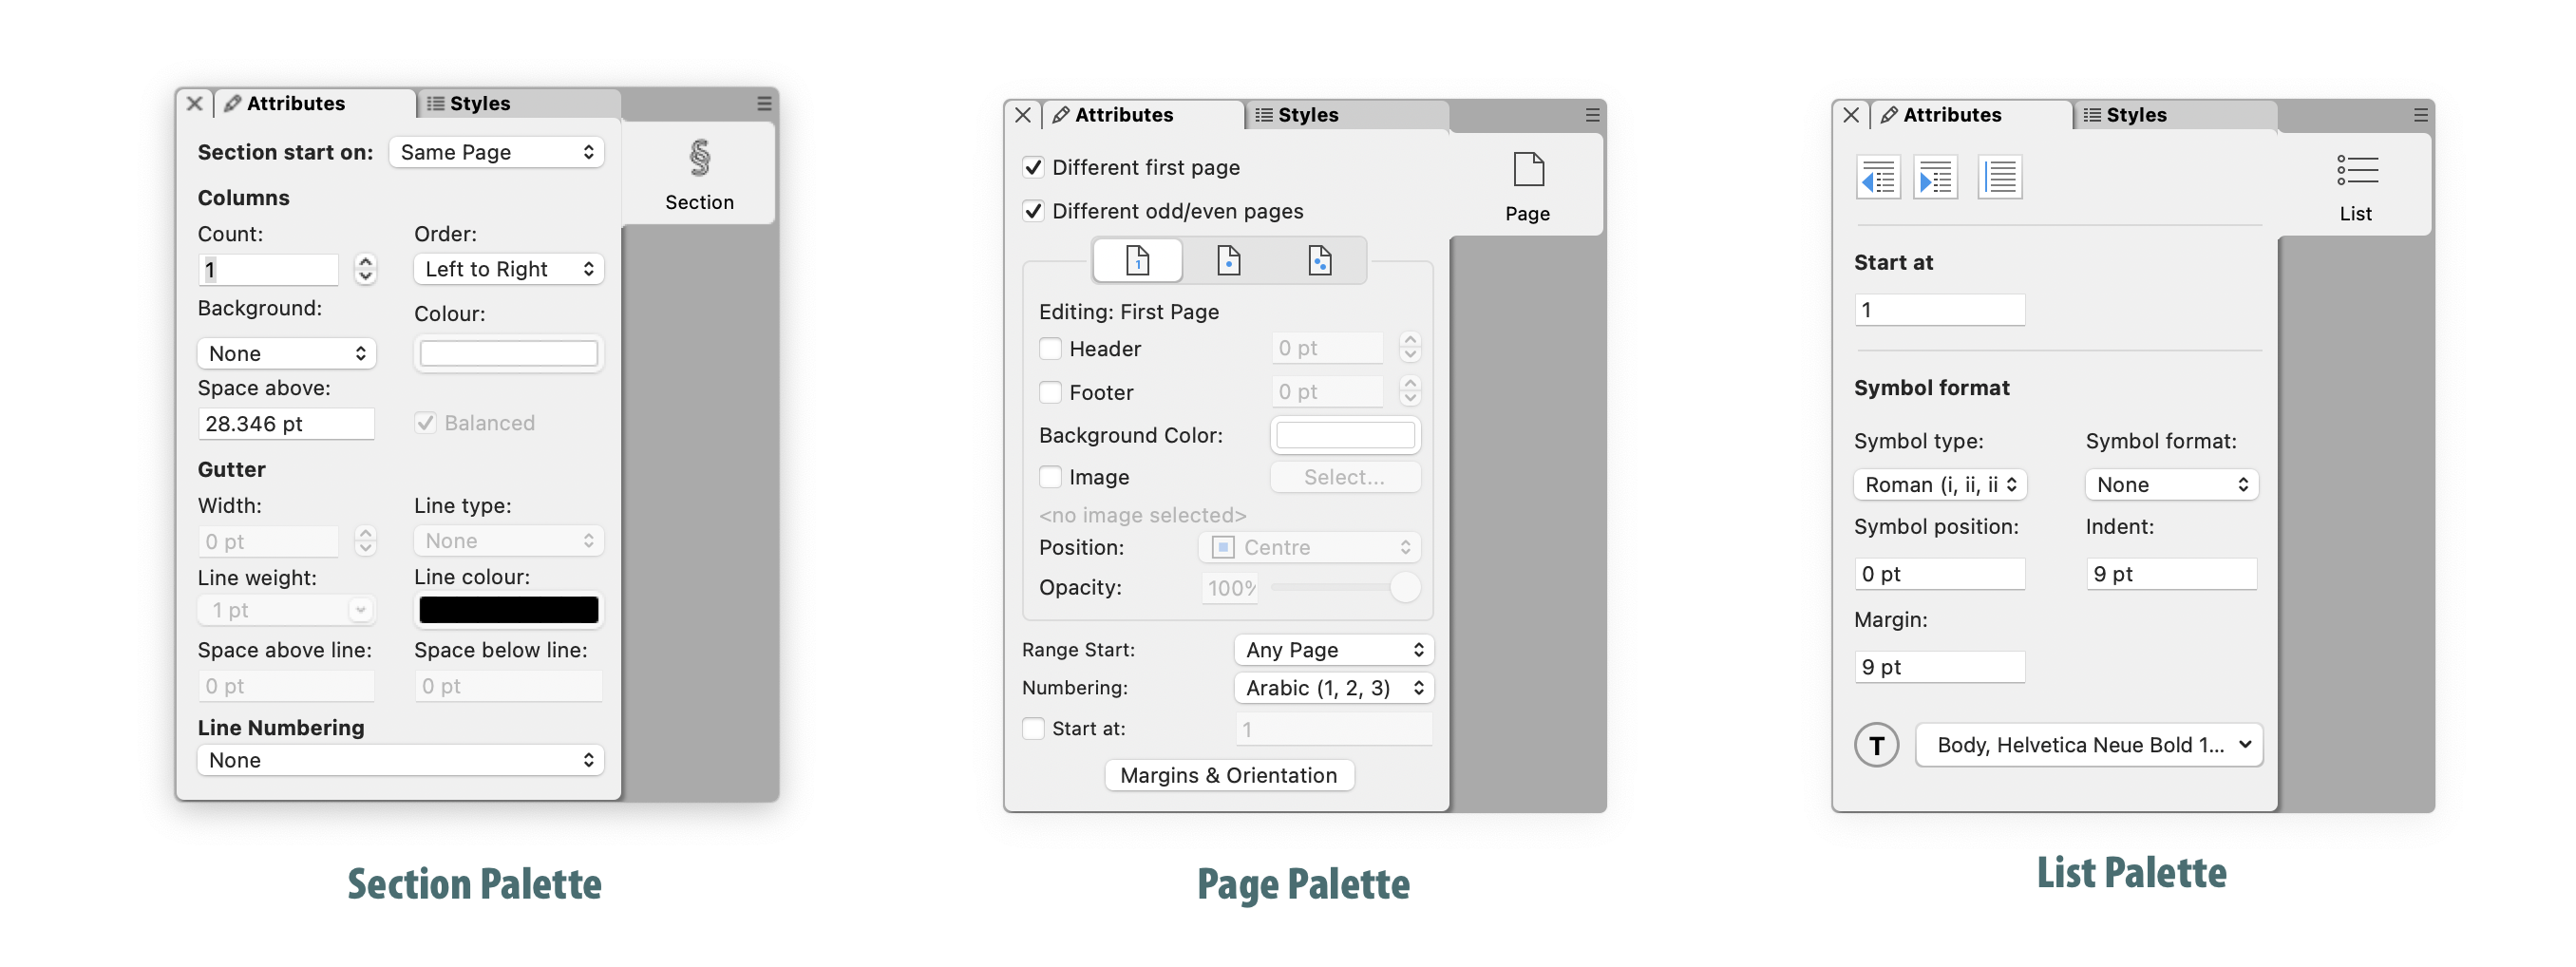
To learn more about page formatting, refer to the Page Formatting guide.
Styles
About Styles
In Mellel, a style is a way to pack all attributes of a formatting type (for example: character, paragraph or page) together under a name. Styles make applying formatting a breeze by allowing you to define formatting once and reuse it multiple times. Styles also help ensure that your formatting is consistent across your documents.
Styles are packaged together in a Style Set which can be shared among documents and be applied at once.
There are many style types; with each controlling a different scope of formatting attributes. For example, character styles control attributes such as font, font size and text color while paragraph styles define attributes like paragraph alignment and line spacing. However, you cannot define a font in a paragraph style. Instead you can associate a paragraph style to a character style so that applying the first will also apply the second.
Applying Styles
To apply a style, use the "Styles" tab of the corresponding palette. For example, to apply a character style use the character palette "Styles" tab as follows:
- Select the text you want to change.
- Double-click the style name in the character palette "Styles" tab.
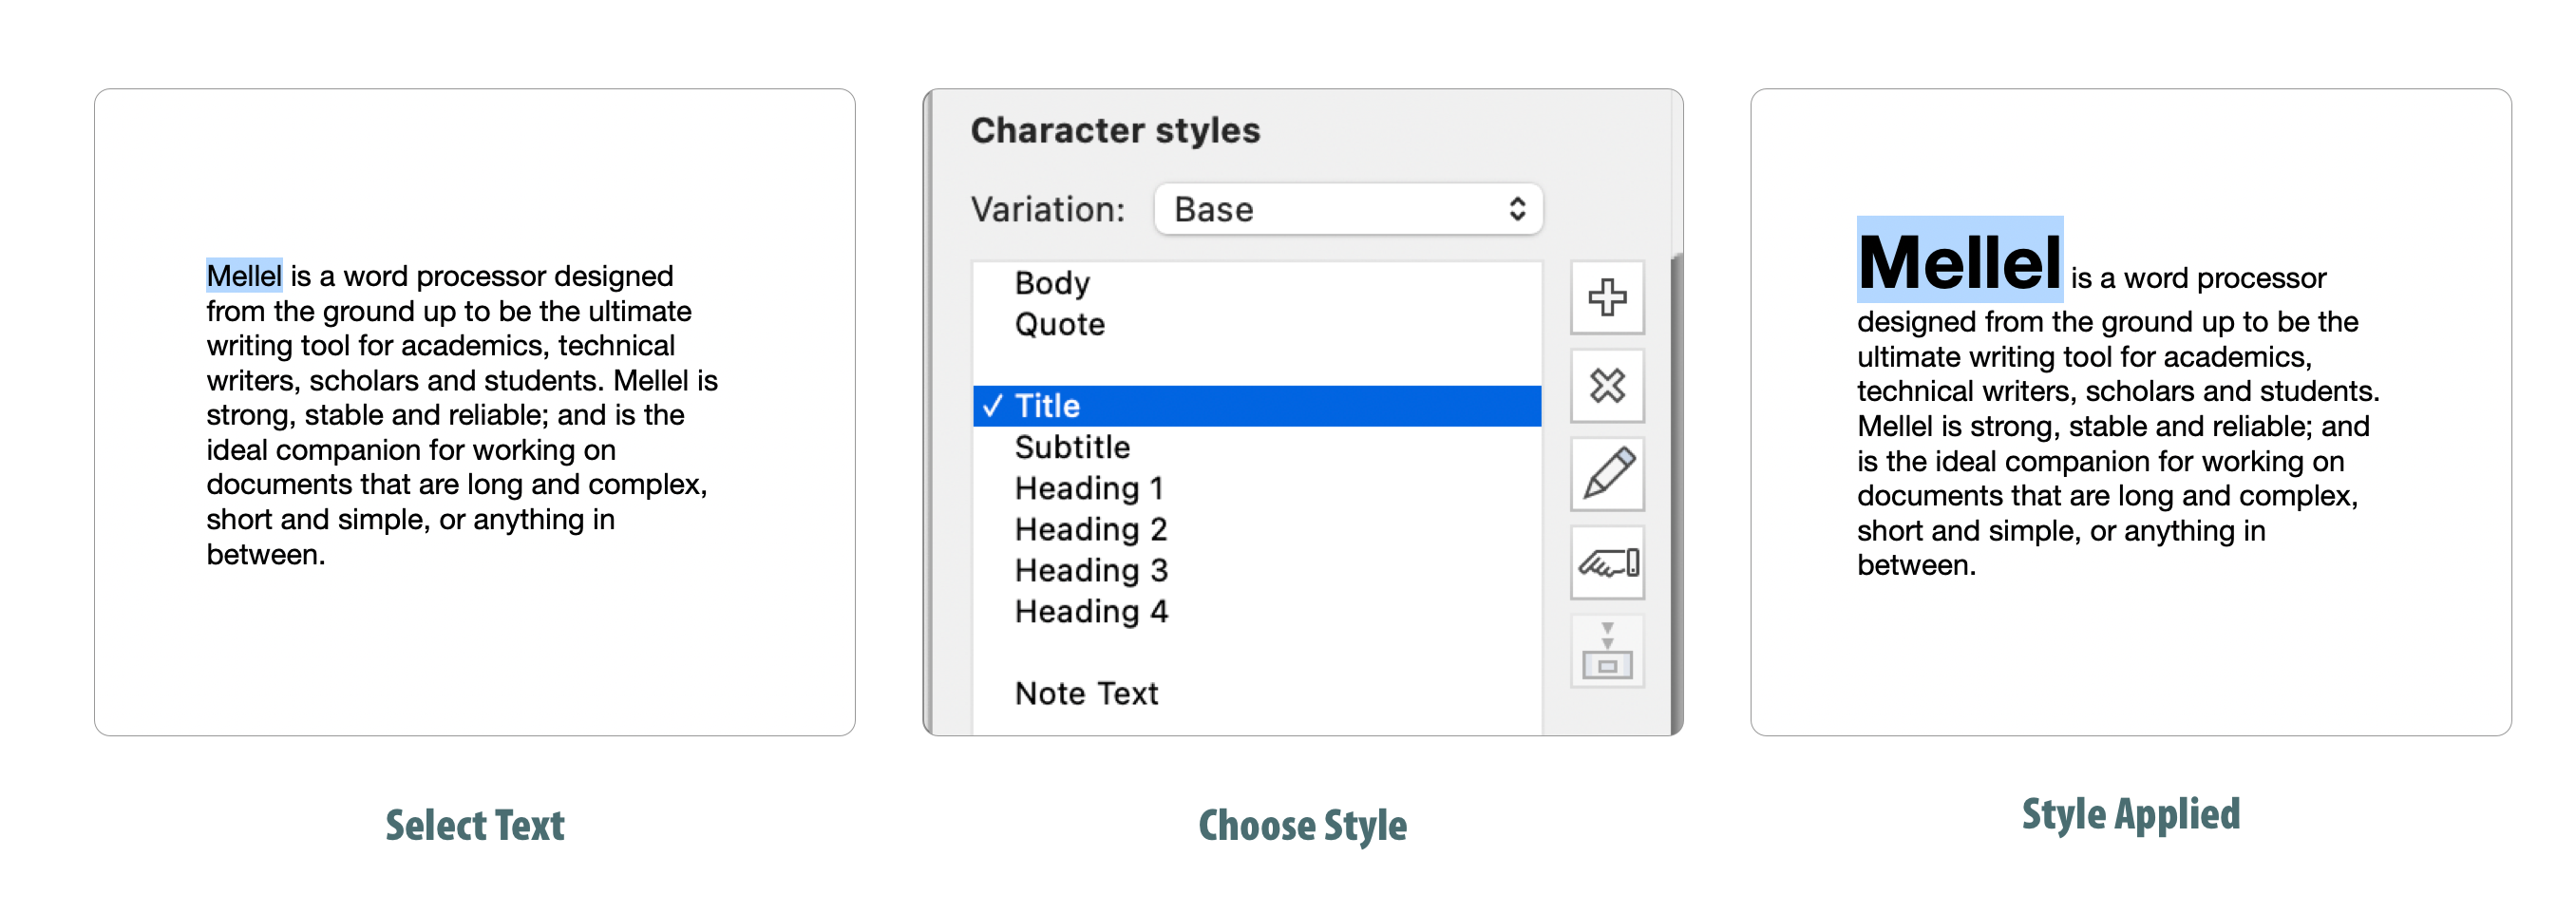
Applying Character Style
You can add, delete and edit styles by making modifications in the style sets window which can be shown by choosing Styles > Edit Style Sets... You can also edit styles using the "Styles" tab of the corresponding palette. For example, to edit a character style:
- Click on the character palette "Styles" tab.
- Select the desired style by clicking it once.
- Click the Edit Style (pencil) button to open the style editing window.
- Modify the style in the style editing window and click Save.
Character Style Edit Window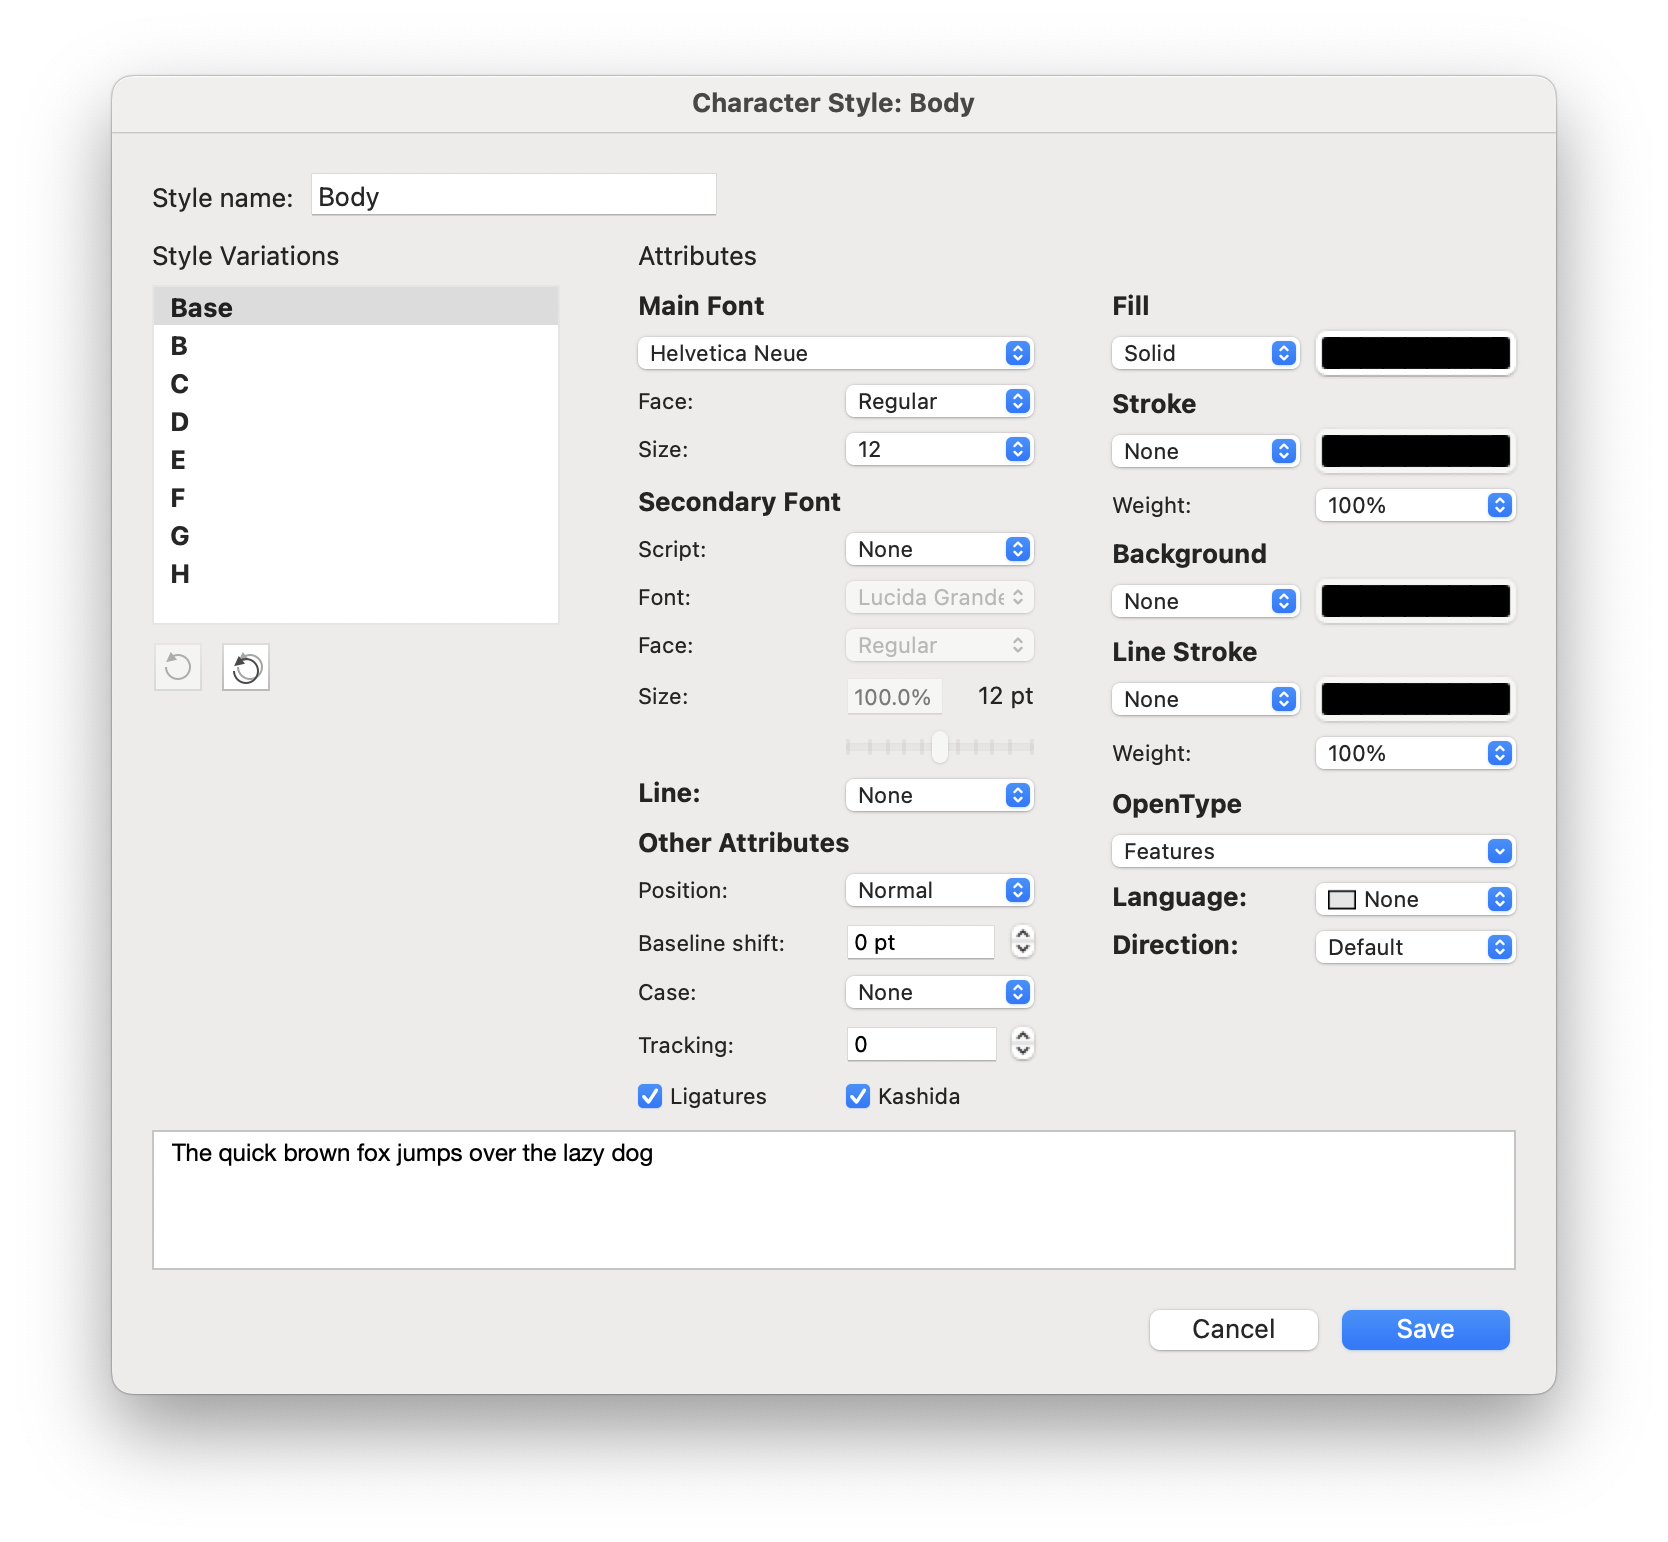
Changes you make in the style editing window will be applied anywhere the style is used.
Editing Other Types of Styles
To edit paragraph styles, use the paragraph palette "Styles" tab. For section styles, use the section palette, and for page styles, use the page palette.
Auto-Titles, Outline and Table of Contents
About Auto-Titles
Auto-titles are objects inserted into your document text that serve as headings and captions. Auto-titles allow you to define your document's structure and achieve consistent formatting. Auto-titles are also used in the outline. This allows you to navigate and edit your document structure. Auto-titles are the basis for other features such as the table of contents or running headers.
Every Auto-titles belongs to an Auto-title Stream. The stream defines the position of the Auto-title in the hierarchy, how it is formatted, and other attributes such as the inclusion of that heading or caption in the table of contents and prefix character.
Auto-title Streams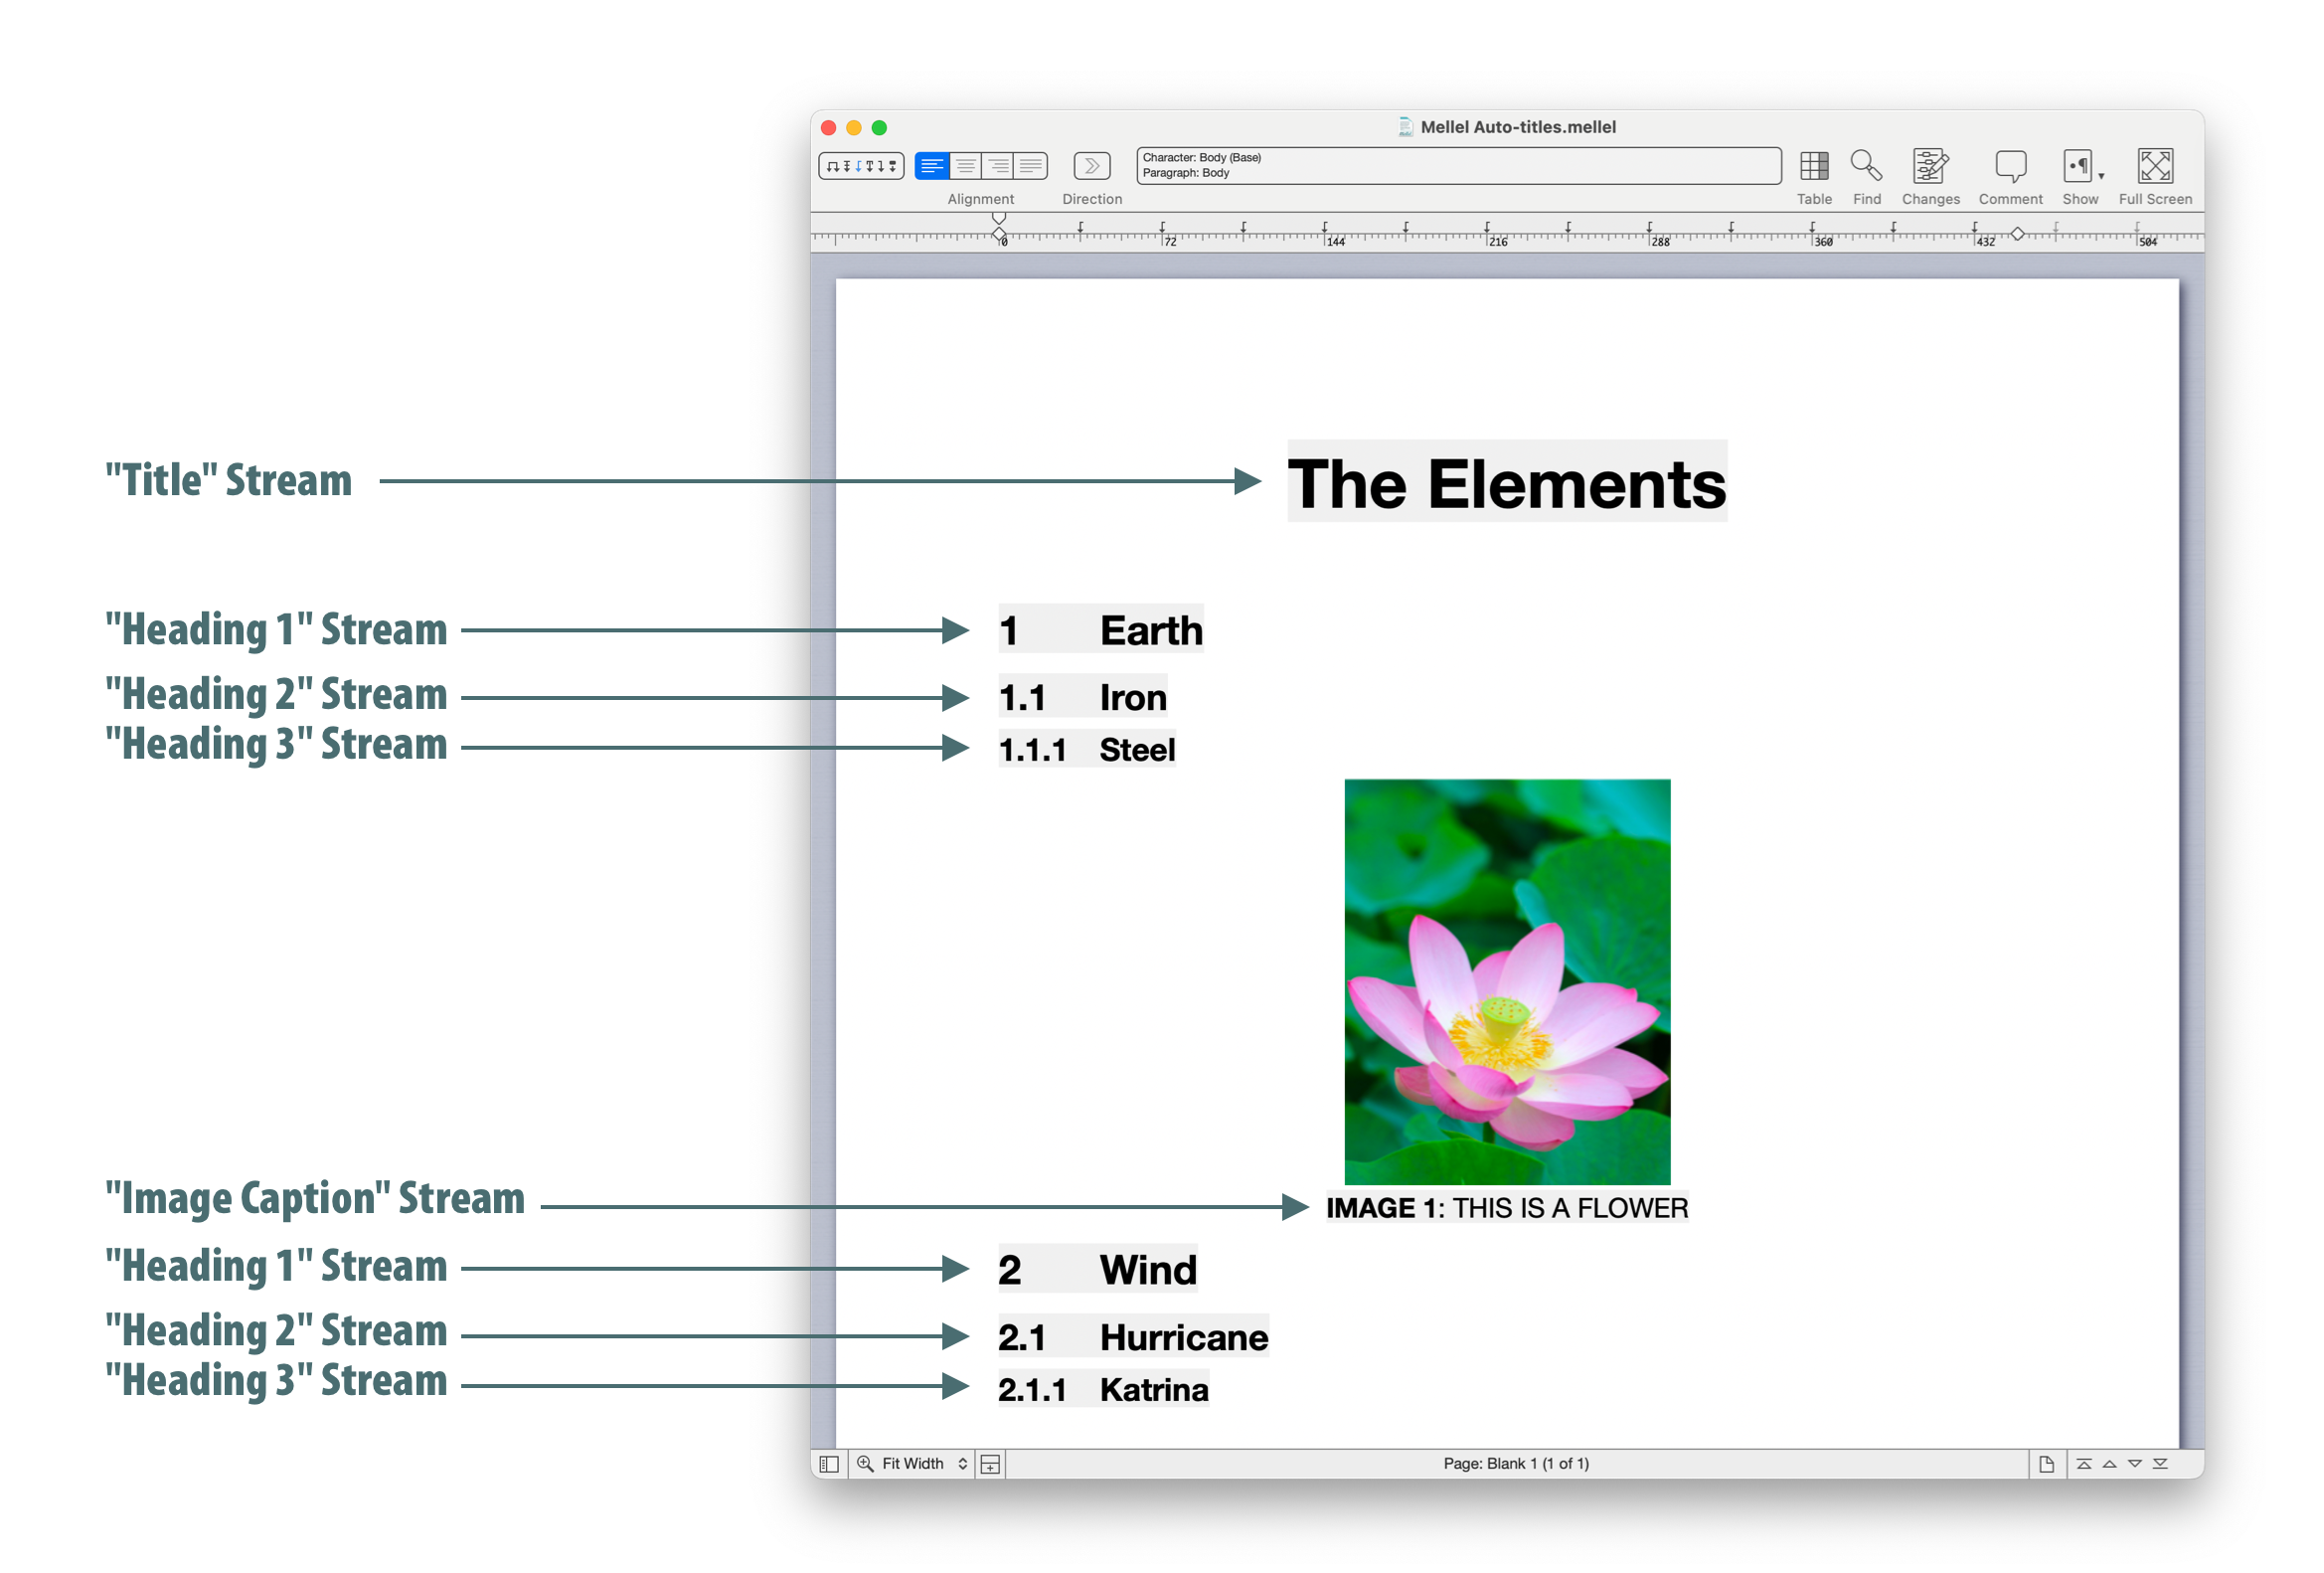
You can define your document hierarchy by adding, removing and rearranging Auto-title streams as you like.
Inserting Auto-titles
To insert an Auto-title:
- Place the insertion point at the desired location.
- Using the Auto-title "Attributes" tab, double-click the desired stream name.
- Type the desired title.
- Press return to exit editing the title.
Inserting an Auto-title
Using the Outline
Every Auto-title in your document is automatically included in the outline. To view the outline, click the show/hide outline toggle button at the bottom left of the document window.
Show/Hide Outline Button
Clicking on an outline item will navigate the document display to the location of the corresponding Auto-title. Use the filter field to quickly find Auto-titles of interest in the outline.
The Outline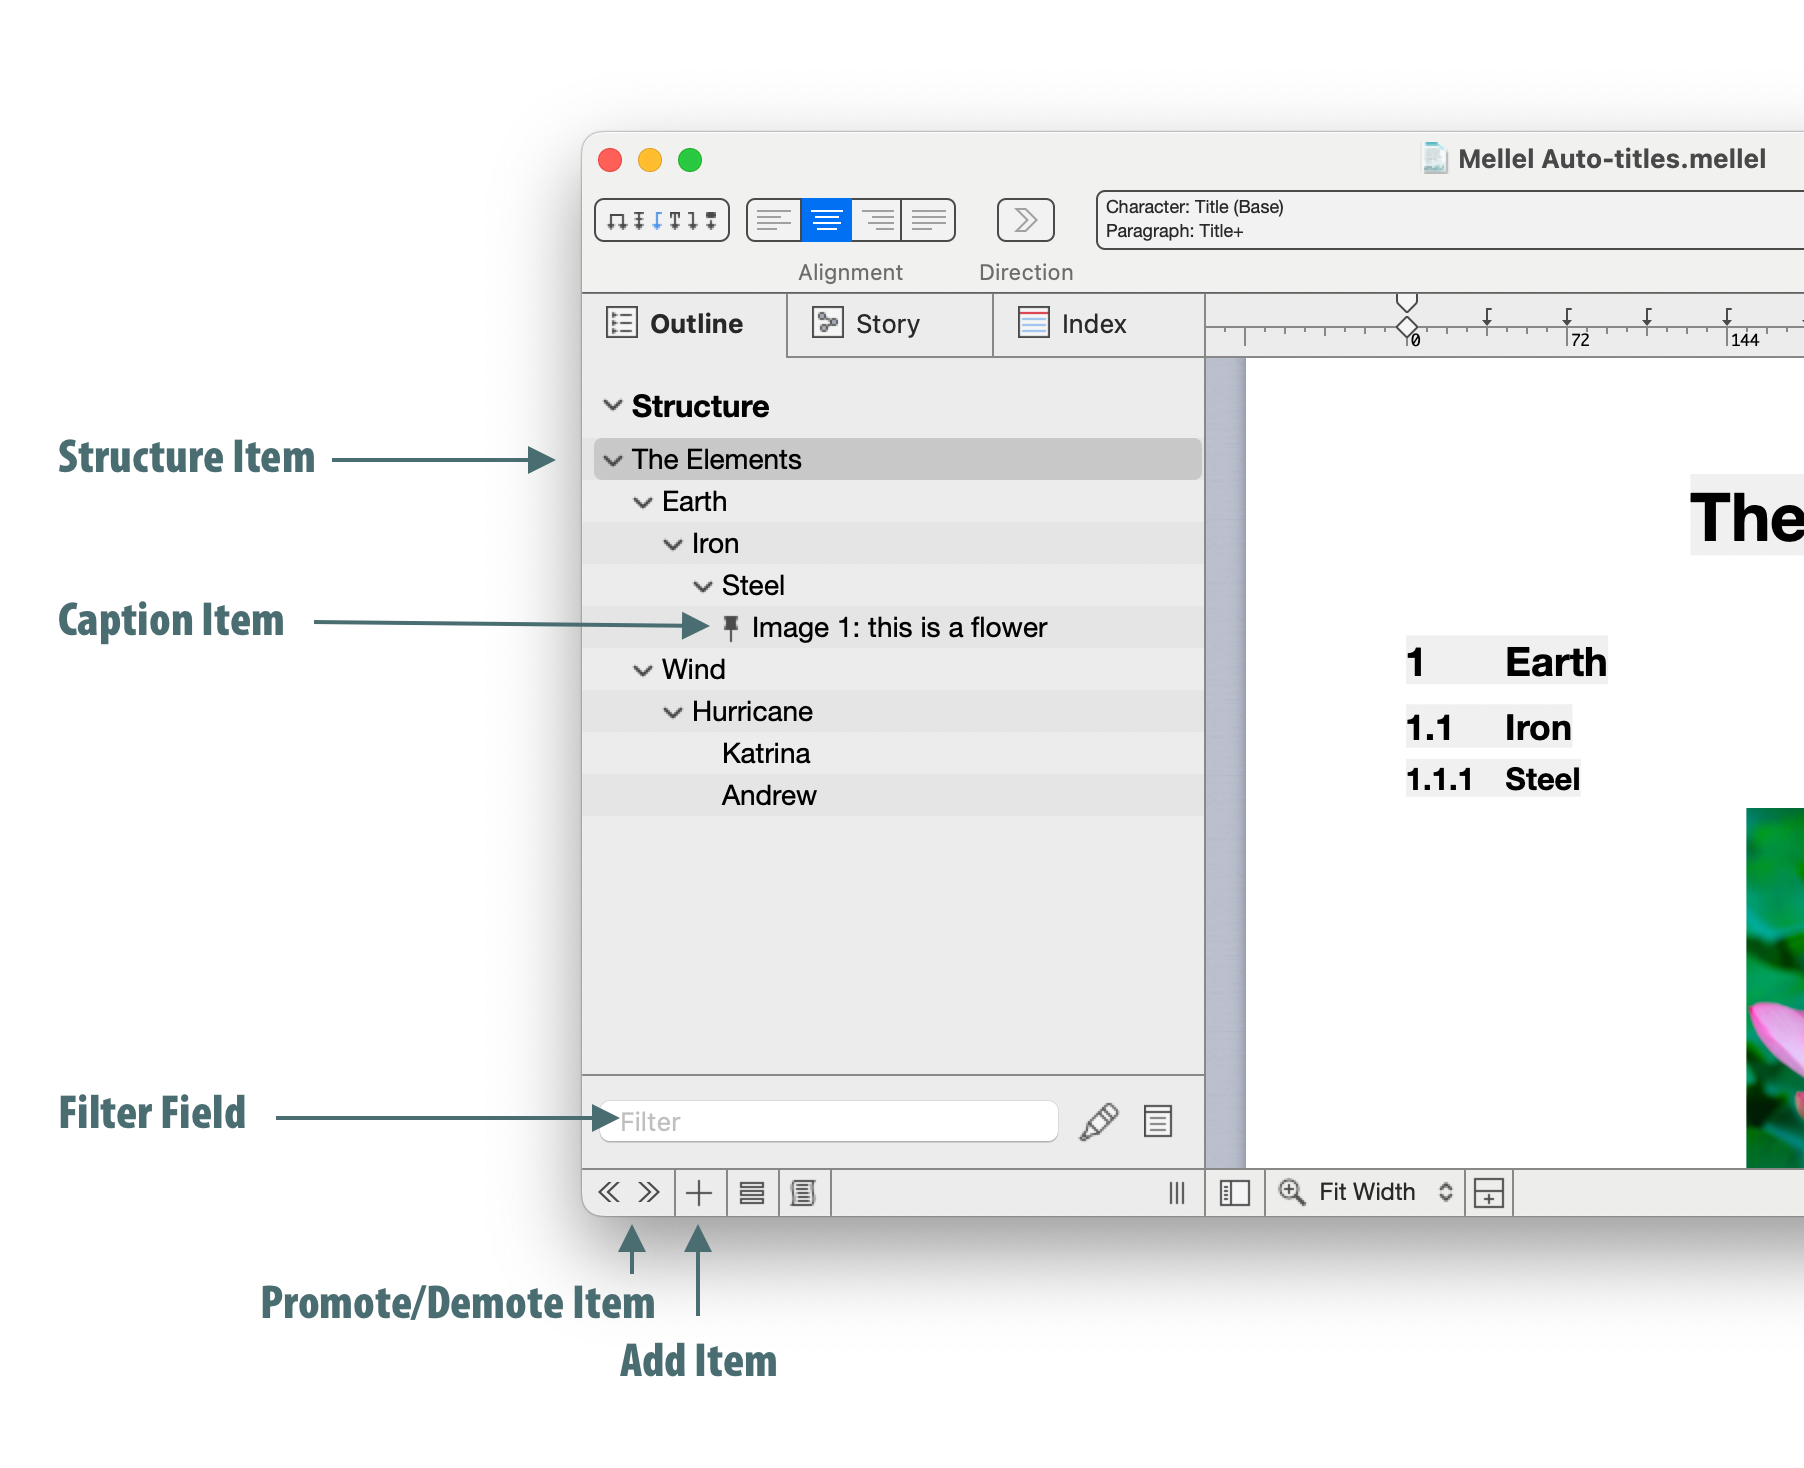
You can also edit the document structure by dragging around outline items. These editing operations will take the corresponding Auto-title and the text that follows it and move them to the indicated location.
Configuring Auto-titles
You can configure Auto-titles in your document to control the formatting of the Auto-title headings and captions, add or remove streams, determine which streams are included in the table of contents and and many other settings. To configure Auto-titles choose Insert > Auto-title > Configure Auto-titles...
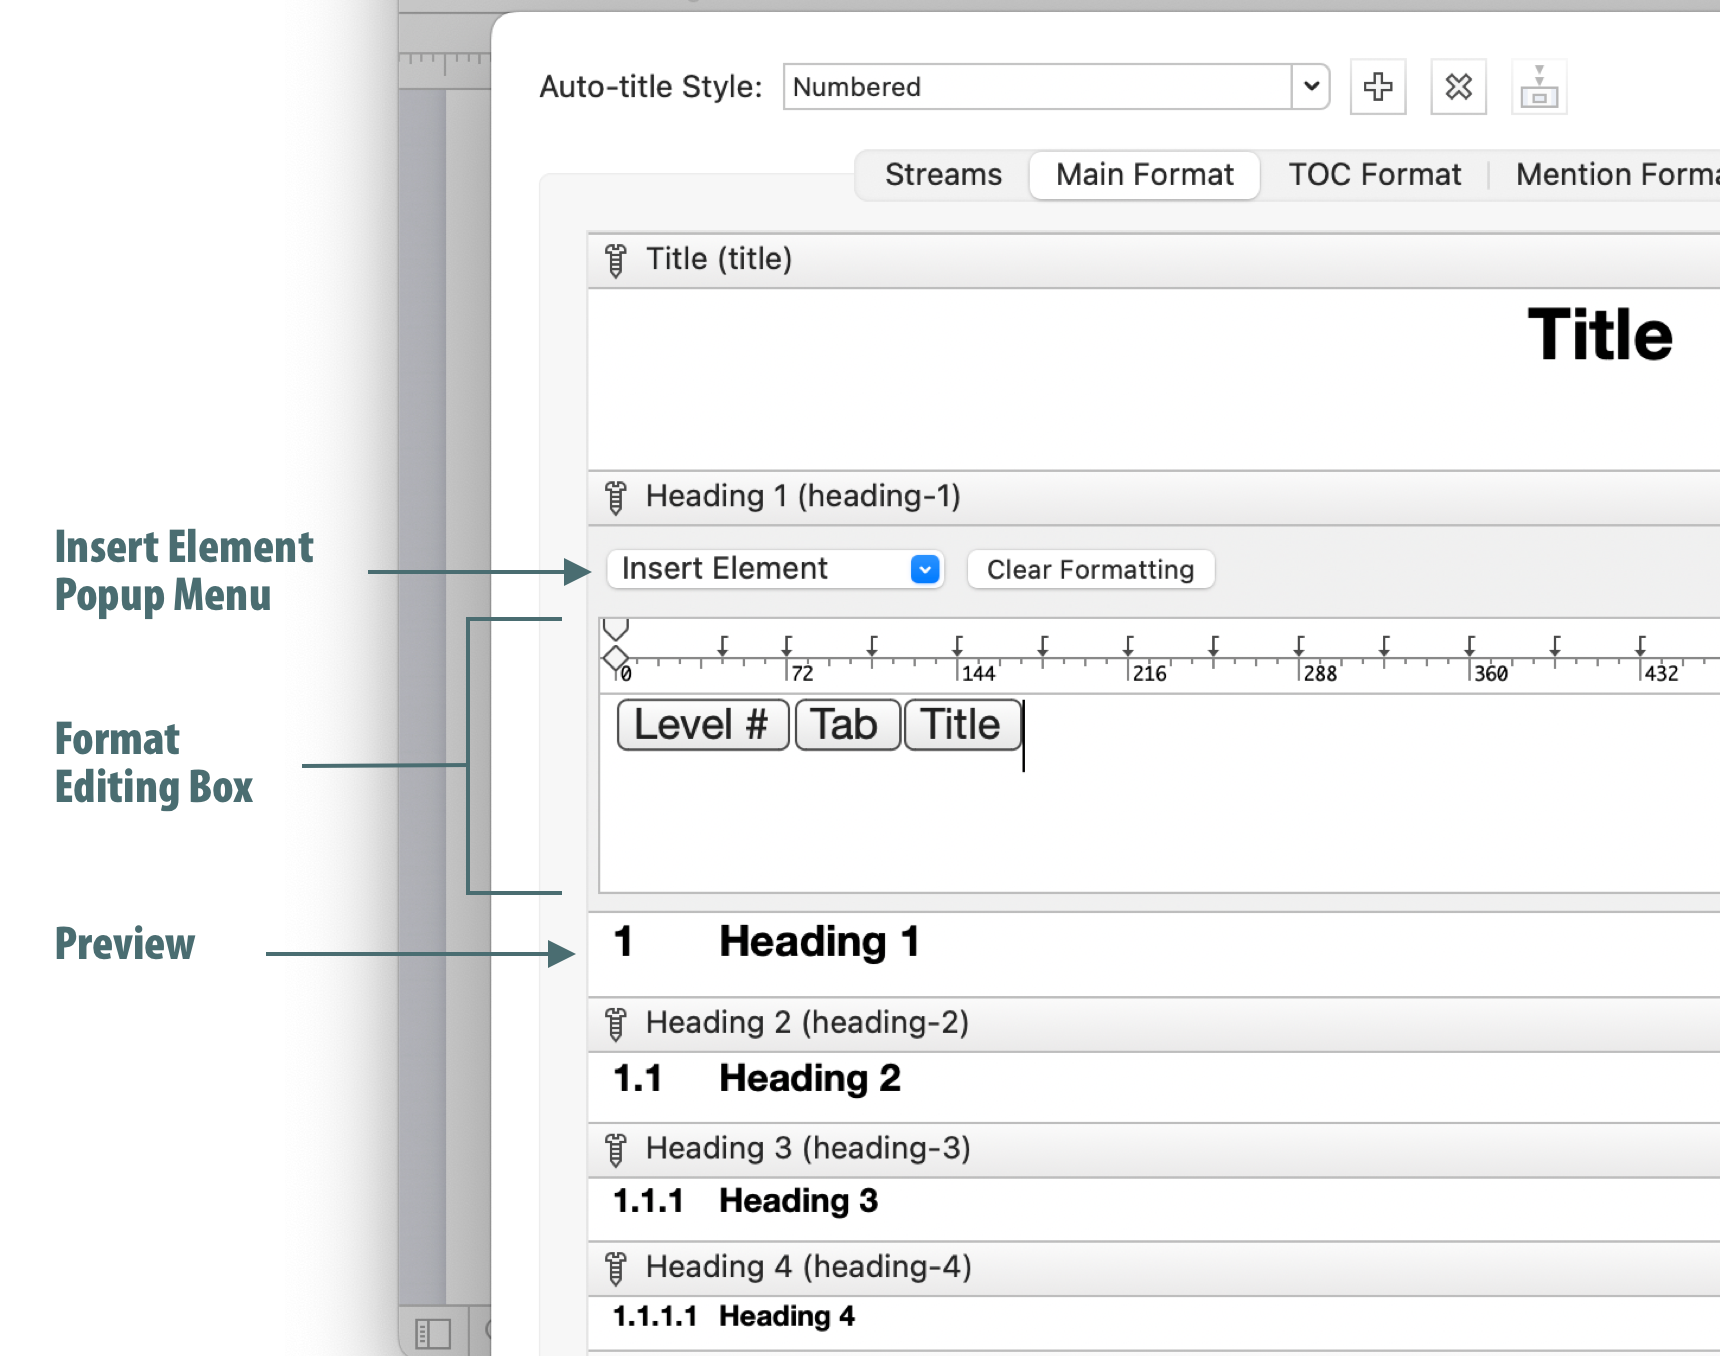
For example, to change the formatting of Auto-titles of a certain stream do this:
- Choose Insert > Auto-title > Configure Auto-titles...
- Click on the "Main Format" tab.
- Next to the desired stream, click "Edit".
- In the format editing box, make changes by adding text or elements and format them using the character palette.
- Click "OK"
Editing an Auto-title Format
The elements popup menu of the format editor allows you to insert variables such as the sequence number (chapter number, sub-section number), title, sequence numbers of the containing level in the hierarchy and more. Virtually any conceivable configuration is possible.
Adding a Table of Contents
In Mellel, the table of contents generation feature is based on Auto-titles. To insert a table of contents choose Insert > Table of Contents.
Inserting a Table of Contents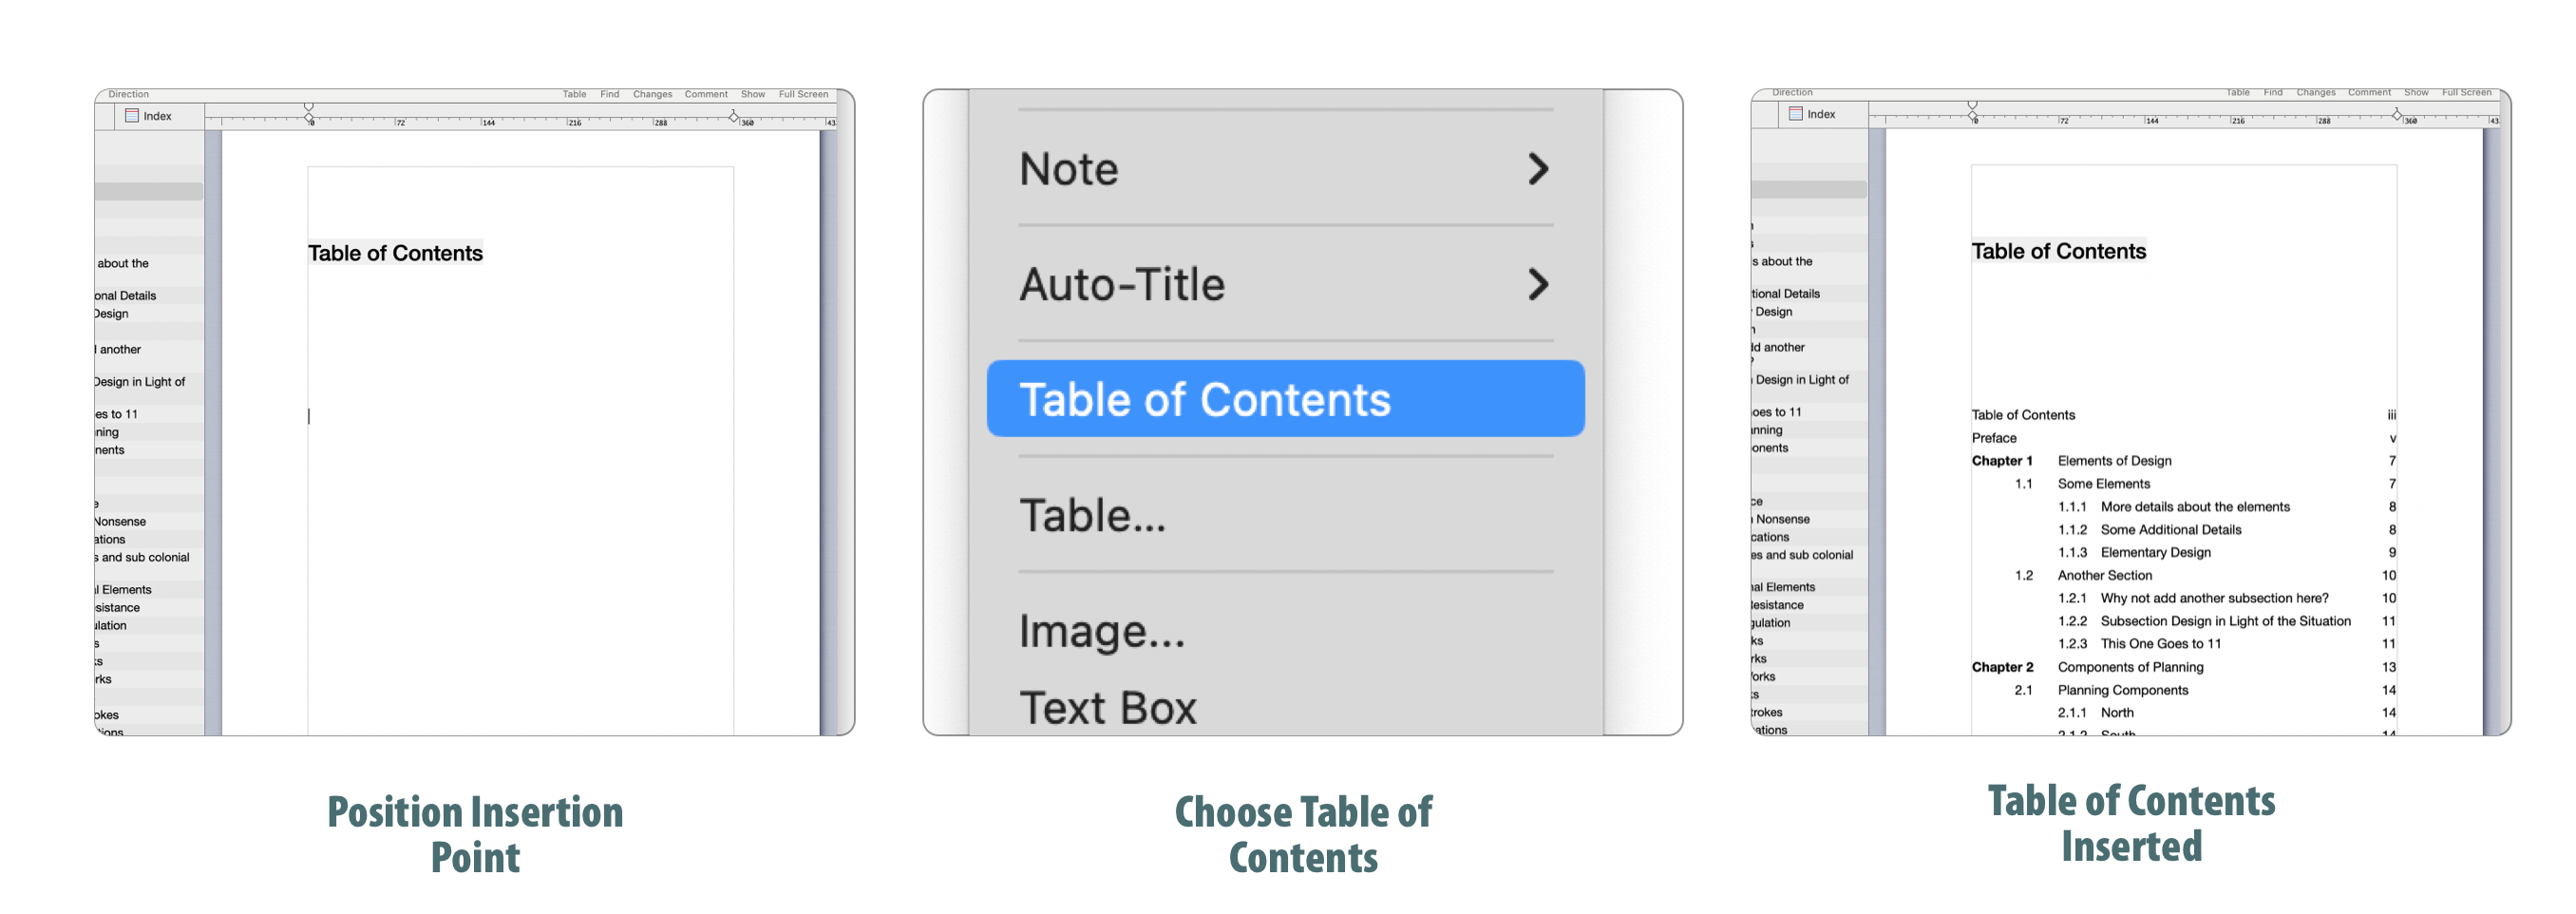
To exclude or include a stream from the table of contents:
- Choose Insert > Auto-title > Configure Auto-titles...
- Select the stream from the list on the left.
- Use the "Include in table of contents" checkbox to make your setting.
Setting Table of Contents Inclusion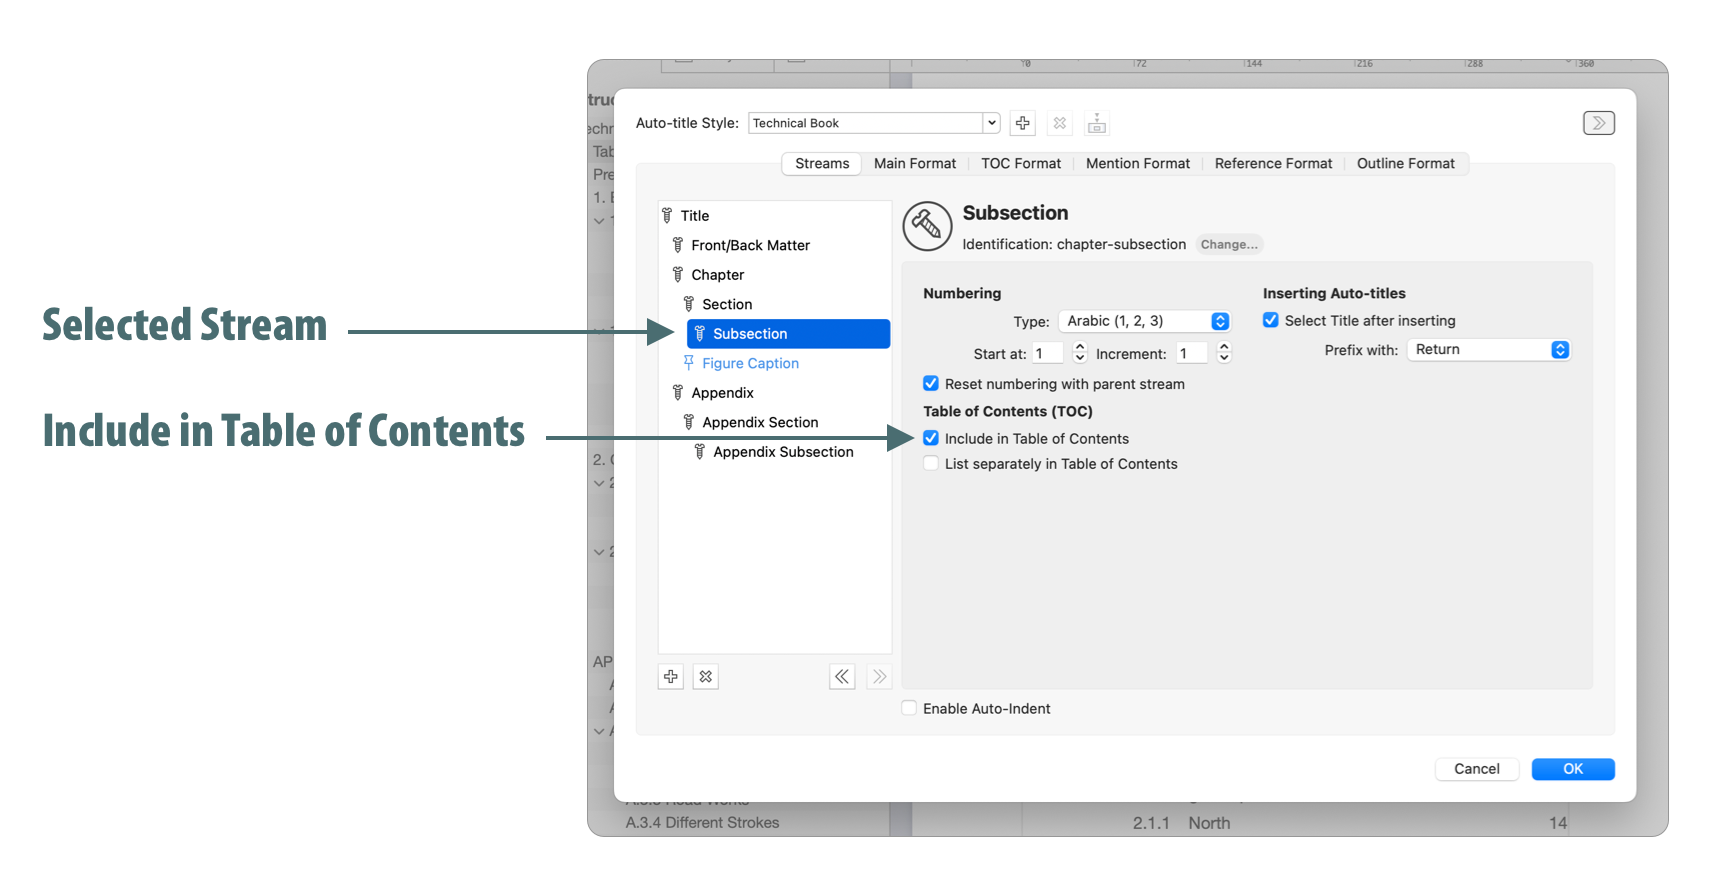
To configure the appearance of the table of contents:
- Choose Insert > Auto-title > Configure Auto-titles...
- Click on the "TOC Format" tab.
- Click "edit" next to the stream you wish to modify.
- Edit the format by typing, adding elements, and formatting it using the character palette.
Editing Table of Contents Format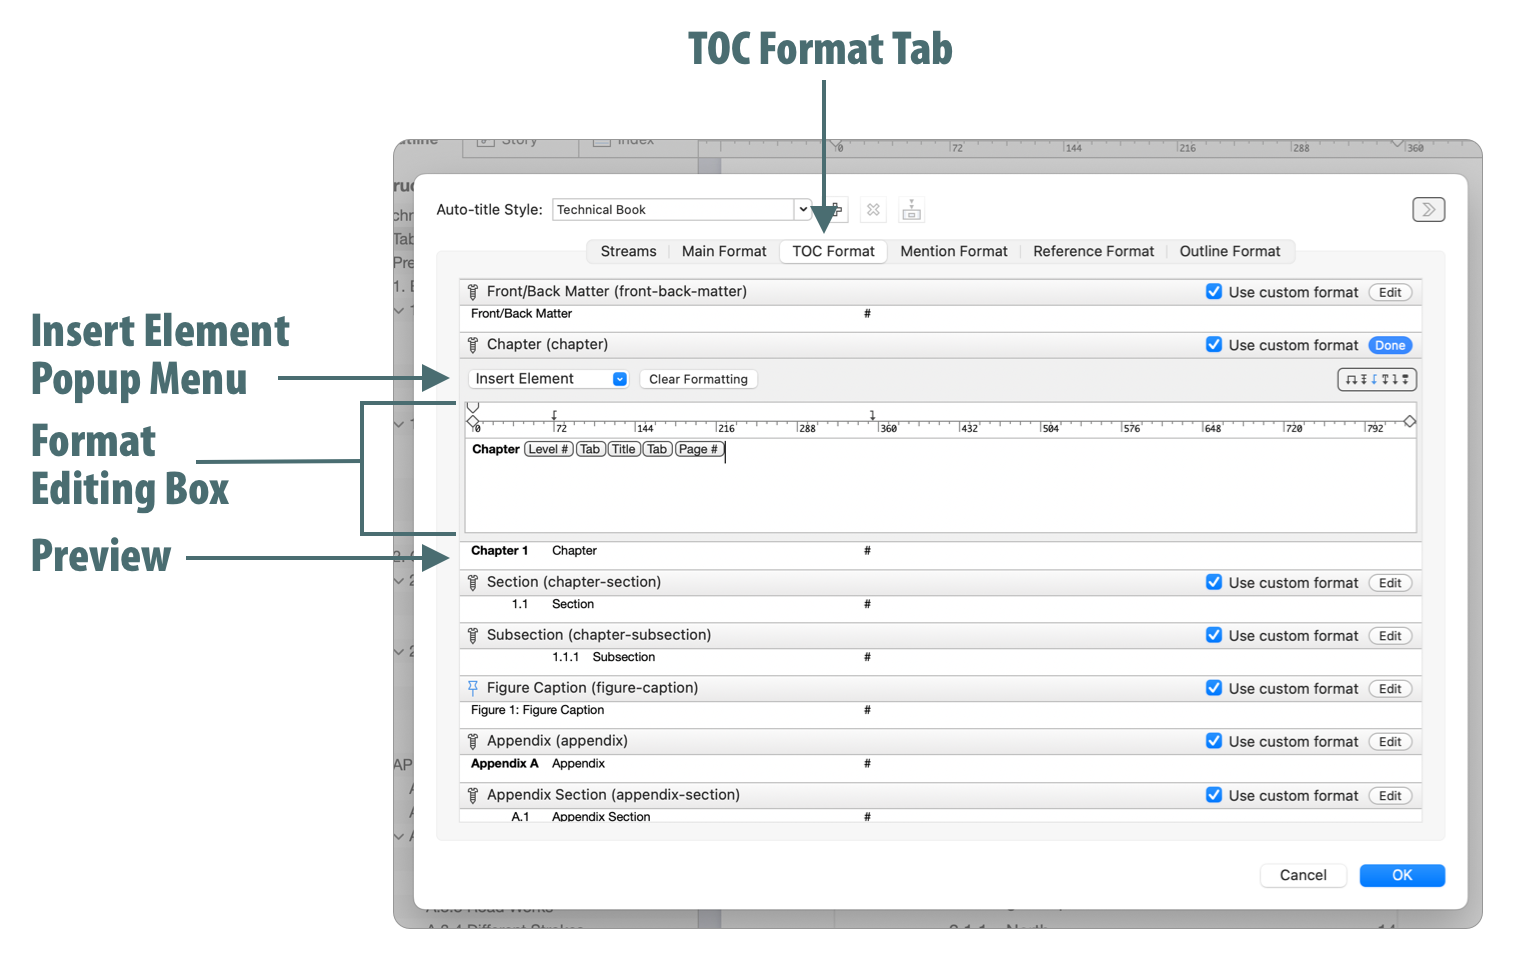
Bibliography with Bookends
Mellel has a very robust and easy-to-use integration with the reference manger application Bookends. The Mellel + Bookends integration allows you to insert and format citations and bibliographies in your manuscript.
Setting up Mellel and Bookends to work together is easy. After installing both apps, choose Bookends as the bibliography application in Mellel's "Settings" window and then and choose Mellel as the word processor in Bookends' "Settings" window.
Choosing Bookends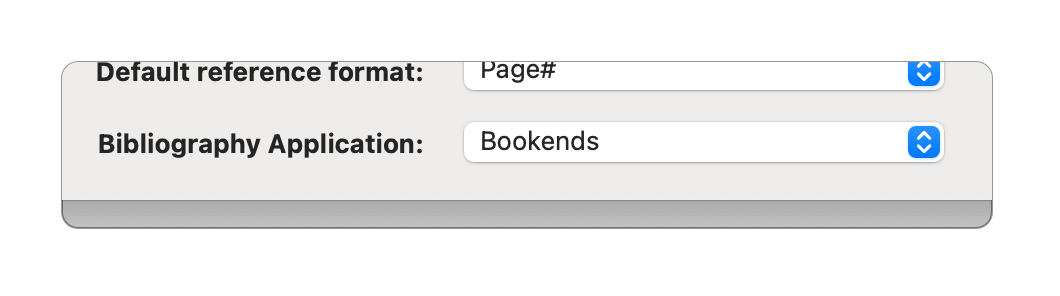
To insert a citation at the insertion point, select it in Bookends and click the "Copy Citation" button in the toolbar. The citation is initially shown in its unformatted temporary form. You can also insert citations by dragging them from the Bookends library into your Mellel manuscript. Mellel keeps a list of used citations in the document in the bibliography palette and you can use that list to reuse citations.
Inserting a Citation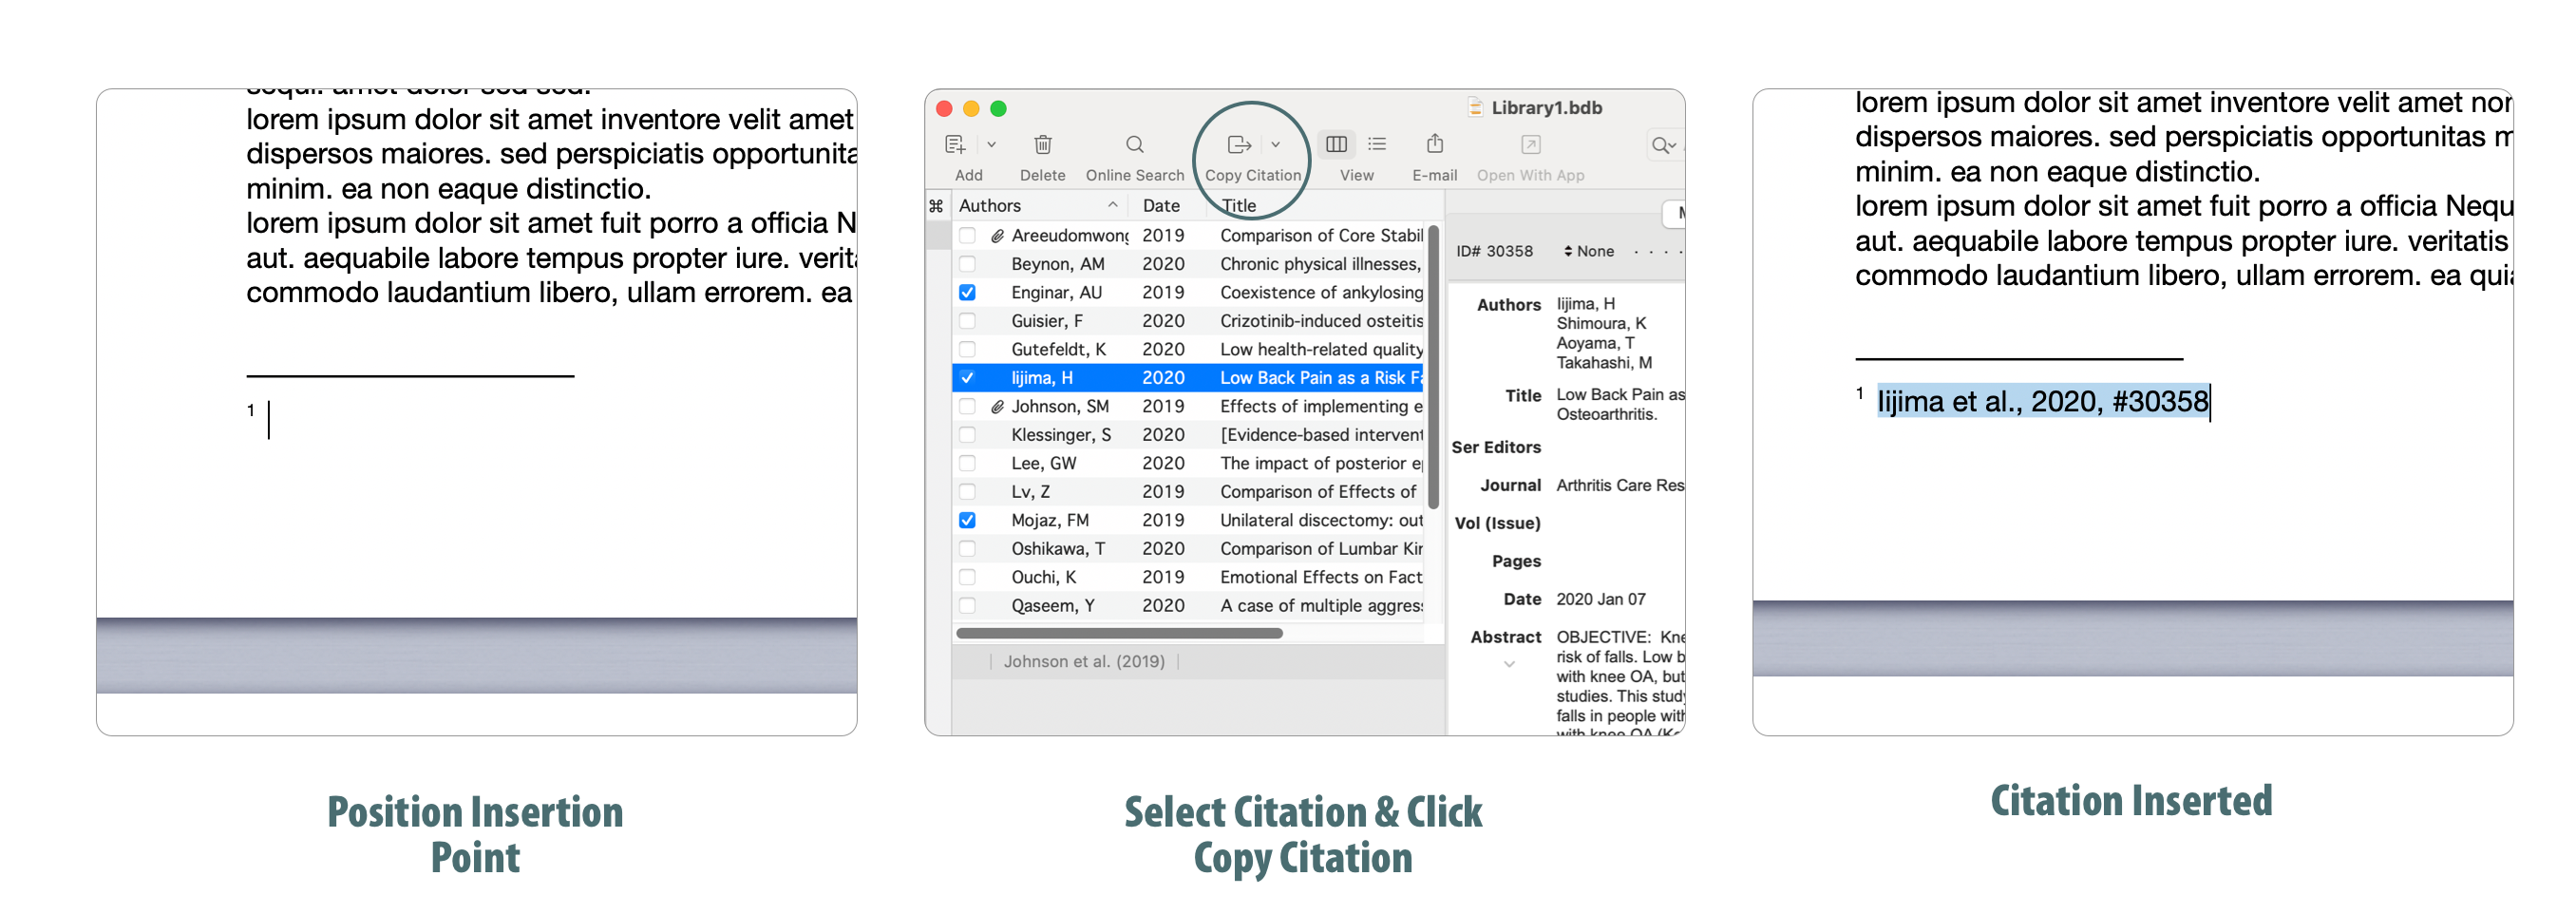
To produce a bibliography click the Scan button in the Bibliography palette; choose the bibliography format and click OK. With the help of Bookends, Mellel will put all the citations into their final form and insert a bibliography.
Bibliography Scan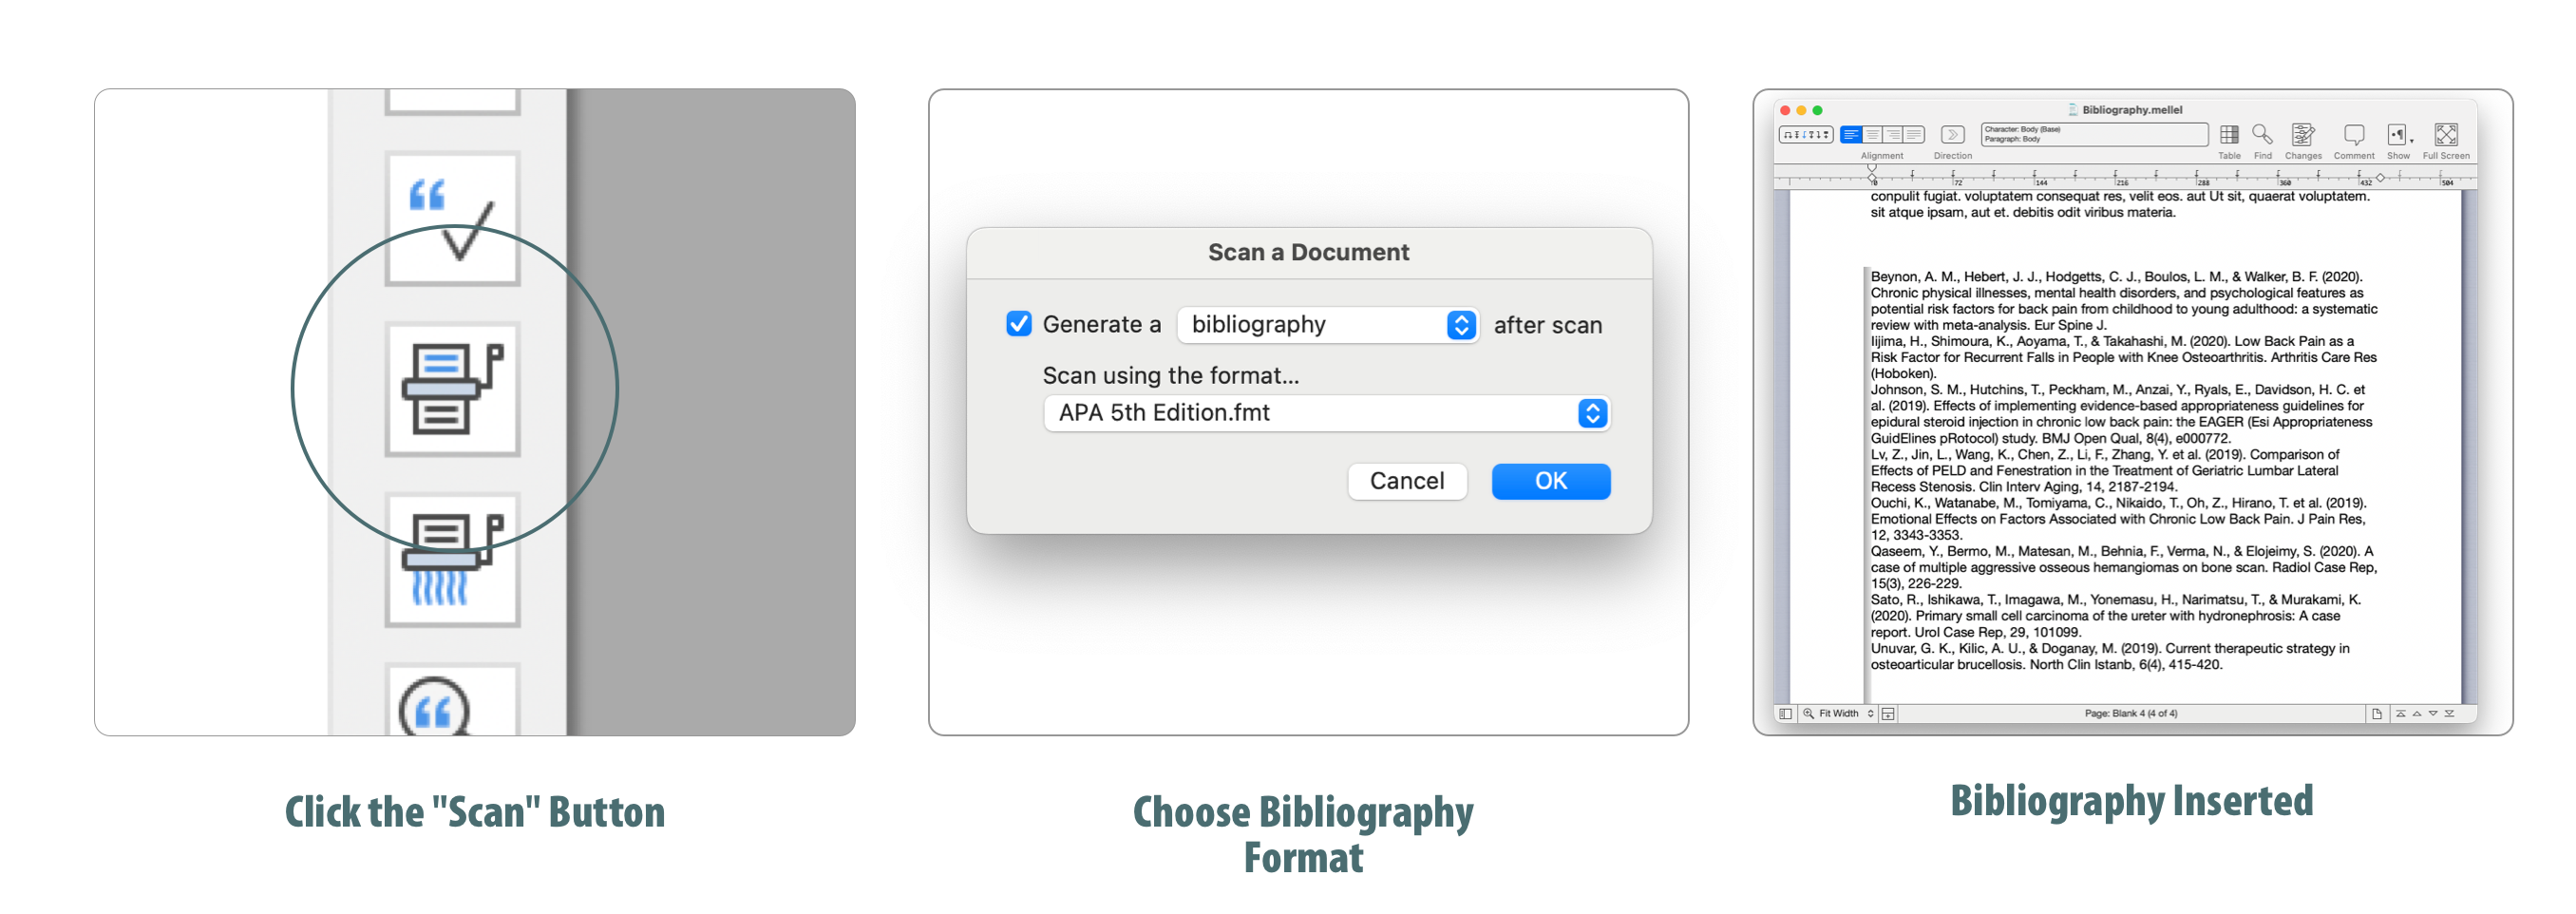
With Live Bibliography you can automate the process, and Mellel will automatically update the bibliography as you insert or remove citations from your manuscript. To activate Live Bibliography simply check the "Live Bibliography" checkbox in the Bibliography palette.
Activating Live Bibliography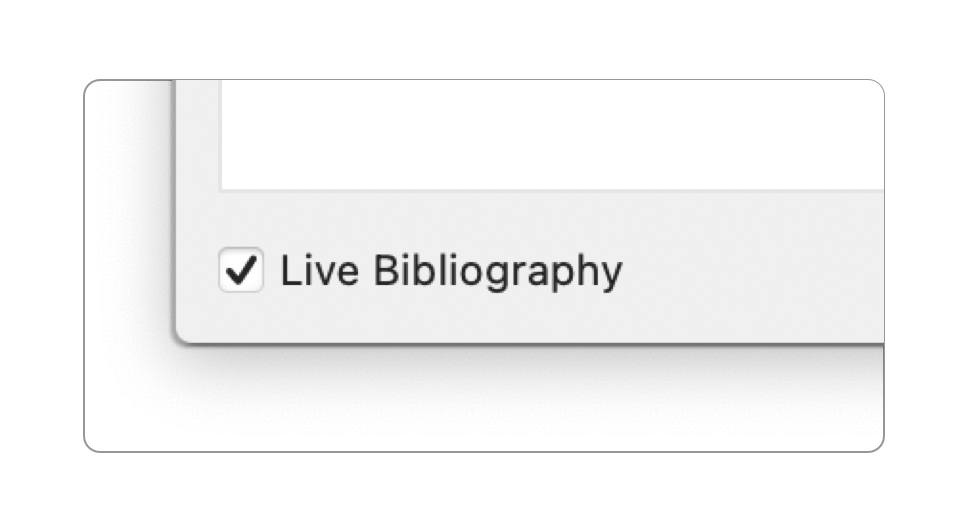
Templates and New Document Defaults
A template is a document that is used as a starting point for new documents. Mellel comes with 22 built-in templates for blank documents, books, publications and more, but you are not limited to this number. You can easily create your own templates and use them to create new documents.
To create a template:
- Create a new document.
- Set up the document as you desire by adding styles, configuring Auto-titles, view options or any other document and formatting setting.
- Choose File > Save as Template
- Name your template and, if desired, check the "Make Default" checkbox to make that template the default.
Save as Template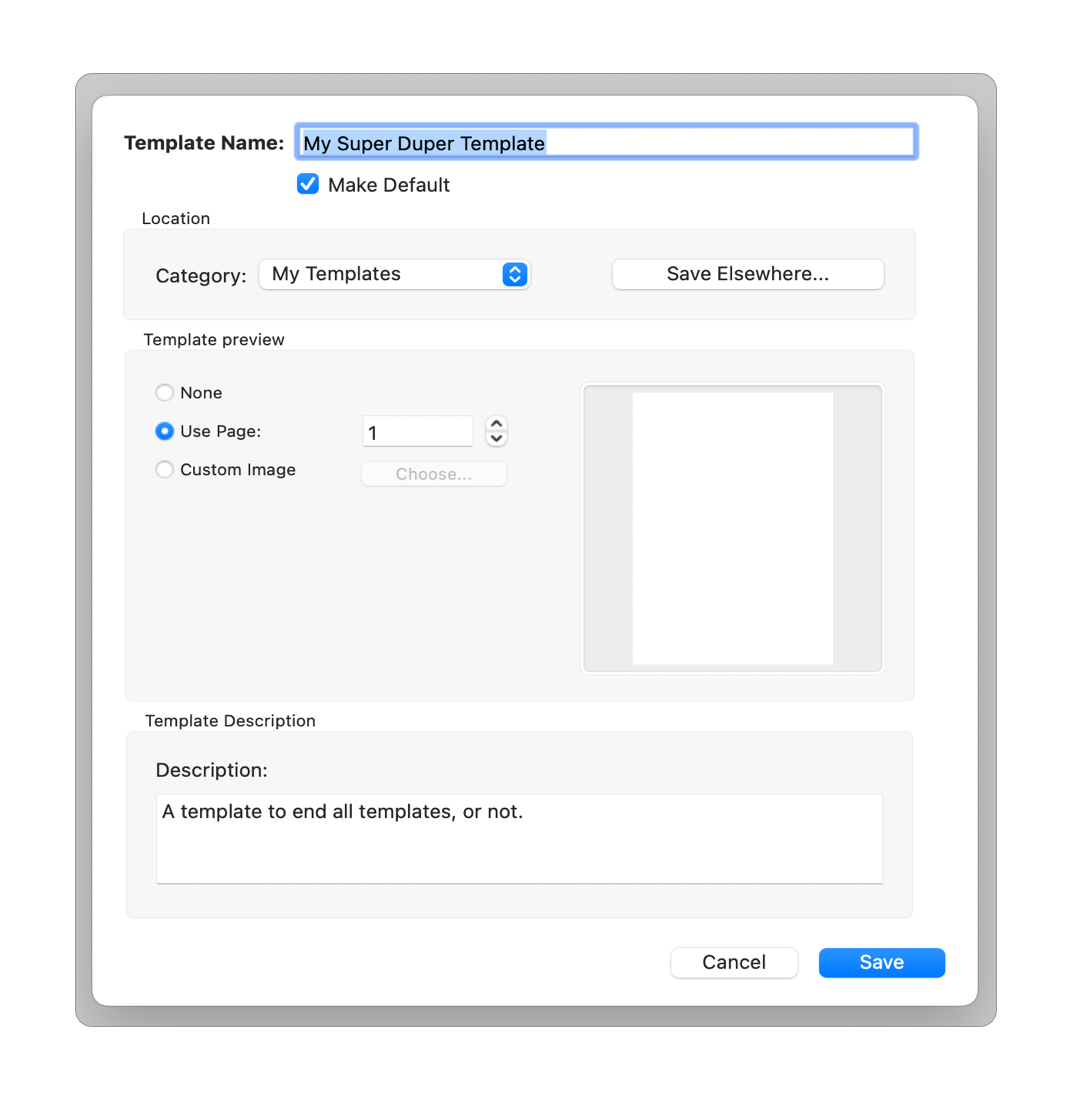
If you have an existing document you wish to base a template on, simply duplicate the document, remove the text and save the result as a template.
By default, when you press Command + N to create a new document, the template browser is shown. However, if you want Command + N to create a new document:
- Choose Mellel > Settings.
- Click on the "Open & Save" tab.
- Select the "Create new document with the default template" in the "New Documents" radio button.
Setting New Document Behavior Preferences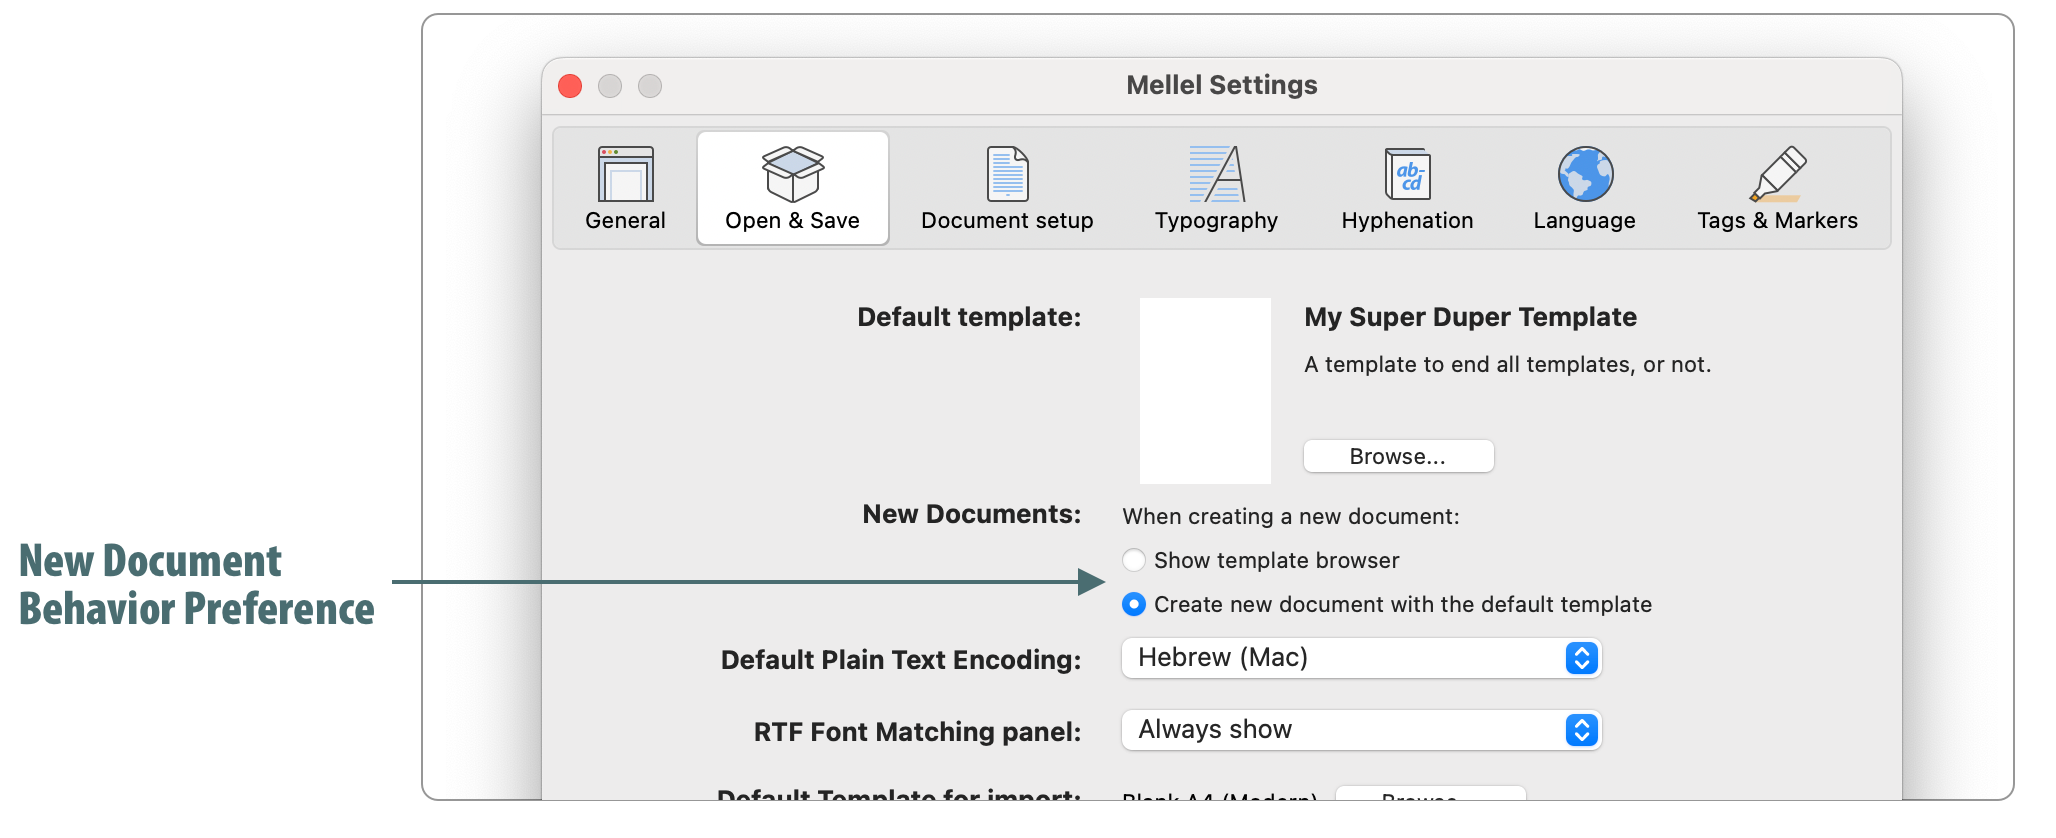
You can always access the template browser by choosing File > Open Template > Browse.
Conclusion
That is it for the quick start guide. We’ve covered the basics but Mellel has a lot more to offer, from the powerful find and replace, multiple note streams, tables, index generation and much more.
Where can you go from here? The best advice is to start working and learn about things as you go along. You’ll quickly learn that once you “get” Mellel, things seem to be where you expect them but if you still need help you can refer to the following resources:
- Mellel Guide: Mellel's user manual is the definitive source for all things Mellel. You can open it by choosing Help > Mellel Guide.
- Forum: Mellel's forum is a place to ask and get help with Mellel from fellow Mellel users. It is also a place to discuss requested features and other topics. You can browse the forum anonymously but you need to register (here) to post in the forum.
Finally, if you still have trouble figuring things out (or just want to talk with us), reach our support. Go to our support page, fill out the form and we'll get back to you as soon as we can.